We close the riser and communication pipes in the kitchen. How to close the riser in the bathroom with plasterboard under the tiles with tiles
Bathroom - the room is more functional, however, when designing it, do not forget about your comfort and aesthetics. Very often during repair, homeowners strive to hide all engineering communications, wall them inside the wall or panel them. However, this decision is often questionable, because in the event of a leak or other malfunction, you will have to dismantle the pipes and spoil the expensive repairs.
In this article we will tell the secrets of experienced finishers how to close the riser in the bathroom with plasterboard or other material to make it look beautiful, but it does not hinder the maintenance of communications.
Fundamental rules
As a rule, in the bathroom there are a lot of pipes, from water pipes to sewers. Superfluous not too aesthetic details spoil the interior of the room, diverting attention, so most homeowners try to hide them during the repair process. If you are determined to close the risers or other utilities in the bathroom, then you must follow the following rules:
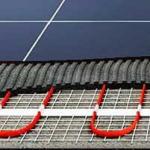
Please note that during the installation of the duct for wiring, you need to provide sound insulation from mineral wool or polystyrene to reduce the noise level inside the bathroom.
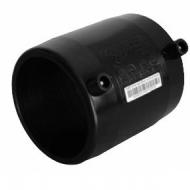
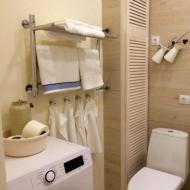
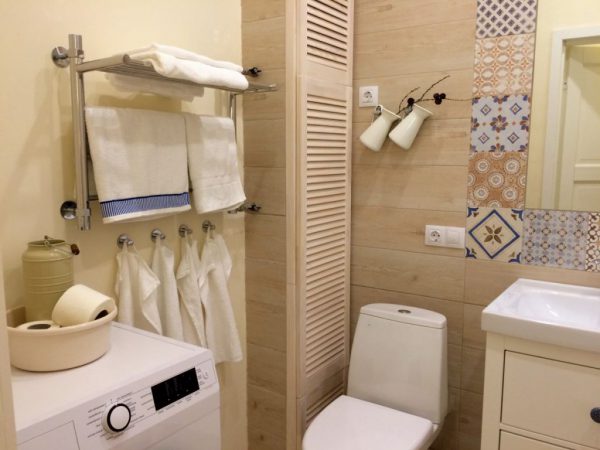
Many, solving the question of how to close the risers in the bathroom, stop their choice on drywall. Moisture-resistant plasterboard is a practical, inexpensive material, from which it is very convenient to mount the box. It is resistant to moisture, it easily falls on any facing material. To work with this material you will need steel guides, self-cutters for gypsum board, a Bulgarian or a hacksaw for cutting sheets, a punch, a screwdriver.
The installation process is as follows:
- First a frame is constructed for a box with risers. It can be made of steel profiles or wooden bars. It is better to use profiles, as they are more durable and durable. If you intend to lining the box with tiles, it is better to use a reinforced profile that can withstand a lot of weight.
- First, the guides need to be attached to the walls, and then to the floor.
- Then, using a hacksaw or a grinder, a sheet of moisture-resistant plasterboard is cut.
- After that, the gypsum board billets are fixed to the frame guides using self-tapping screws and a screwdriver.
- Lastly, the gypsum board is shpaklyuyut, covered with a primer of deep penetration, and then veneered with a finishing material.
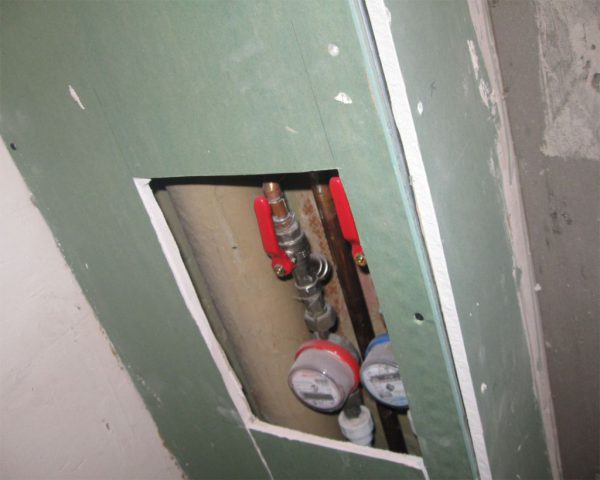
Note! Many homeowners, installing a box for pipes made of moisture-resistant plasterboard with subsequent tiling, do not make the inspection window because of fear of spoiling the appearance of the structure. However, now in building shops are presented invisibility revisions, which are faced with tiles and do not stand out against the general background of the false wall.
Construction of plastic panels
Very often masters-finishers recommend erecting a false wall for hiding pipes, risers and other communications from plastic panels. They are light, inexpensive, moisture resistant, easy to clean and easy to assemble. In addition, in the event of equipment failure and the need for repair, the plastic panels can be carefully removed and then locked back without causing much harm to the finish of the room.

To work with plastic you will need:
- Panels made of plastic like the coloring.
- Bars, plastic or metal profiles for making the frame.
- Plastic rails for fastening panels.
- Plastic corners for the design of external corners.
- Hacksaw or jigsaw for cutting plastic linen.
The advantage of this option is that you can build a plastic structure yourself, and even if the repair in the rest of the room is already done. The work should be performed in the following order:
- First around the riser we install a masking box from metal guides, plastic profiles or wooden bars.
- Then, at the top and bottom of the box let the fixing bar for the panels.
- After that, gently close the box with plastic panels.
- At the final stage, we glue to the outer corners with the help of silicone glue corners, so that the structure looks neat.
Note that the plastic box can not be tiled or any other finishing material, it is impossible to even paint it. Therefore, immediately choose the panels that suit your color and design.
Options that do not require installation
It often happens that the appearance of a bathroom with open risers strains homeowners, but there is no way to start something cardinal. In this case, you can use the ideas of disguising communications with improvised means:

Video instruction
The answer to this question is, of course, yes! Closing the pipes, it is possible to reduce the noise and achieve an aesthetic appearance of the bath and toilet. Many fear that this will make it difficult to access water meters, there will be difficulties with taking readings, and also have to dismantle the entire structure while carrying out repairs.
Existing ways to close the pipes in the toilet and bathroom allow you to keep access to water meters and access the pipeline for necessary manipulations.
There is an opinion that first it is necessary to replace the pipes with modern metal-plastic ones, and then to perform the installation on closing. It's a delusion. A closed pipeline and a sewage riser make the room more pleasant for visual perception, cleaning becomes easier, materials (blinds, plastic, shutters) enable easy dismantling and unhindered access to the pipeline.
During installation, remember that mandatory access to water meters and shut-off valves is necessary. This is the first thing to consider when asking how to close the risers in the bathroom or how to close the sewer in the toilet.

To hide the pipes in the bathroom and toilet, there are 4 types of designs:
- on the frame - typical presence of a metal, gypsum board or wooden frame, which is faced with plasterboard sheets, PVC panels or cement-particle boards;
- hinged - special shutters or blinds are made, which are fixed to the ceiling and close the riser;
- combination of several designs - combined structure on the frame and hinged in the form of a lifting system.
- assembled - a non-separable box with a window for access to the meters.
Below we will discuss in more detail the methods of installing each type of structure.

Ways to install structures on a frame
- Continuous bulkhead. The false wall is assembled in the form of a box on the far or side wall. The frame is clad only on the outside. Plus - one type of material is used for plating (plastic, tiles, fiberboard). Minus - the complexity of carrying out maintenance and preventive maintenance work, as well as reducing the usable area. It is mainly used in the toilet.
- Bulkhead with angular arrangement. The structure of the partition is no different from continuous. Used to hide the pipeline located in the corner. If the pipes are at some distance from the corner, a large area must be blocked to close.
- Rectangular boxes. A universal method that is used to close vertical and horizontal pipes. The frame is located as close as possible to the pipes, only where they pass. Formed speeches can be used as shelves. Complexity arises when using this method to conceal the towel rails in the bathroom. The problem is in the features of repair and replacement of heating systems.
- Boxes from several levels. A combination of a false wall and a box. Usually, the boxes are mounted close to the pipeline, but remote from the wall plane, repeating all the tube protrusions. This allows you to save as much useful space as possible. Multi-level systems are ideal for large rooms.

Ways of installation of hinged structures
- Jalousie. This method of closure is used as an aesthetic method. Plus - does not prevent access to the pipeline. Venetian blinds are installed in the bathroom when the pipes are located on the rear wall. If the pipeline is located on the side wall or in the corner, the installation loses its meaning. Blinds for bathroom or toilet are best chosen from aluminum, as it is preferable to plastic. Such a hinged design allows you to create a bathroom in one color scheme, without sharp transitions. Blinds made of metal can be painted.
- Shutters. They are very suitable for installation in the toilet room. First, measurements are made, and shutters are made on them. There are no standard designs. Used as blinds to close the far wall. Installation is possible from the side, but in a combined form, together with plasterboard boxes. The combination is convenient because there is no question of placing a window to access the meters.
Pipe box for 30 minutes (video)
Sound insulation of structures
Sound insulation is needed in multi-storey buildings. The sound of the draining water, coming from behind the assembled structures, is very few people can like. This is important for sewage.
To solve the problem, glass wool is used. With the help of cotton wool wrapped around pipes, it is possible to reduce the noise intensity several times.

Assembling constructions from boxes and false walls
- Metal base. To make such a frame, the pipes are welded through a sketch directly in place. The frame is fixed to the ceiling, walls and floor. Metal is taken not too thick, usually 1.5 mm, to fasten the sheets of plating with conventional screws. Facing the structure with cement-particle boards. The design is used for placement in niches of equipment or heavy objects. An example is a water heater. The materials and complexity of work stipulate the high cost of such a design.
- Basics of CD and UD for gypsum board structures. The assembly is made in the form of a grid with a size of 600x600 mm. Fastening is carried out by self-tapping screws. In addition to plasterboard, plastic is used. Here, a horizontal method of securing the CD every 500 mm is used. Directly the plastic is attached to the screw with a press washer.
- Wood base. The most budgetary option. Any of the materials listed above can be used for the cladding. It is not recommended to install such a frame in rooms with high humidity due to the risk of deformation.
Description of carcass plating materials
- Polyvinyl chloride (PVC, plastic). Pleasing eye and not heavy stuff. Well withstand high humidity, which is important to consider when working in the bathroom and toilet. From it, it is easy to obtain details of the necessary sizes and shapes, and seamless panels will create the effect of the integrity of the entire structure. The color and variety of material will allow you to choose an option for every taste. The main drawback is fragility.
- Laminated chipboard (Chipboard). Of the chipboard make furniture. This decoration is used to combine styles with the entrance door. The use of chipboard allows you to design niches in the form of cabinets with doors. The main disadvantage is the cost of such cladding.
- Wall paneling made of wood. It is possible to use a large area in the bathroom and toilet. But do not forget about the increased humidity. The combination of wood with plastic or tiles is not the best option for decor.
- Cement-particle board. Heavy, but durable material. Absolutely not afraid of moisture and not deformed. It is cut by a special grinding machine. The main disadvantage is the difficulty in arranging a window for taking readings and examining the system.
- Sheets made of gypsum plasterboard (GKL). When choosing a gypsum board for facing, it is necessary to take moisture resistant sheets with a thickness of at least 12.5 mm. Decent material that is easy to handle and resistant to finishing materials (plaster, tile, putty). When exposed to water, it loses its structure and stratifies.
How to hide pipes in the bathroom (video)
Decorative trimmings
After the lining is finished, you can proceed to the decorative finish of the toilet or bathroom. Here are a few ways to finish:
- ceramic tiles - used for a long time, relevant in our time. In the market there are many samples of tiles for every taste and color. Advantages of this method are known to all: durability, accessibility, universality. The main thing is to beautifully beat the revision window, so that it harmonizes with the created composition.
- Textured plaster - allows you to hide the errors when installing the skin. It is easy to apply and does not require careful adjustment of the pattern. However, requires more careful care of the frame and skin.
- If there is an old cabinet furniture, having disassembled it it is possible to receive an excellent covering from the chipboard for the skeleton, which will not yield to its qualities again bought.
- If the construction It does not involve the placement of heavy equipment or cabinets, the fixing can be done with a mounting foam. The basic rule is the fixation of the frame, up to the complete hardening of the foam.
- If you can not find the door for the inspection window, then it can replace the usual ventilation grille.
Attention, only TODAY!
Even the most unique design of the bathroom, which was designed by the most fashionable and expensive designer, can look awful if the riser in the bathroom is not hidden. For lovers of aesthetic interiors, there are several ways that you can hide communications. In today's article, we'll look at how to do this.
Fundamental rules
Sewer risers, as well as other types of communications that are laid openly, are not recommended to wall in the wall tightly. It is better not to use capital partitions for this, but to do with lighter materials, which in the event of an accident or repair can be easily, and most importantly, quickly dismantled. Also, experts do not recommend installing solid structures. It is much more convenient to provide a service door through which you can check the meter reading or the status of communications. The presence of the door will, if necessary, not disassemble the partition.
In order not only to remove the riser in the bathroom, but also to reduce the noise level from the operation of the water supply and sewerage, experts recommend laying a layer of soundproofing materials between the structure. It can be mineral wool or something else.
Selecting the necessary materials, it is worth remembering that the bathroom - a room with a high level of humidity. Products made of materials that do not tolerate the effects of moisture should be pre-treated with special solutions. If you do not take this into account, then after a while the design will lose its attractive appearance. It will begin to form a fungus and mold.
Before completely hiding the pipes, it is worthwhile to worry about that all the elements were made of the same material. This will reduce the risk of accidents and increase the service life.  After the riser box in the bathroom has been fully assembled and installed, it should be covered with insulating materials. This will protect it from constant exposure to moisture.
Basic variants of constructions and their features
How to hide communications? There are four main methods. The first option involves the manufacture of a metal or wooden frame, which will then be trimmed with a wide variety of materials. It can be plasterboard, plastic panels, chipboard.
The second way is to use hinged blinds or any other screens that can be fixed on the ceiling.
The third option is a combination in which a frame structure is combined, as well as a hinged construction. Most often, various lifting systems are used as a hinged structure.  The fourth option is a non-separable box with a window and a service door. The latter serves to simplify the process of checking water meters.
Frame construction
Let's look at popular designs that make it possible to hide the riser in the bathroom. These solutions are built on the basis of a frame made of metal or wood. There are several types of such structures.
Continuous bulkhead
How to fix a riser in the bathroom? A continuous bulkhead is one of the available options for solving this problem. In this case, the false wall is assembled in the form of a box, which is mounted on the far or side wall of the room. The frame is only framed from the outside. The advantage of this option is that only one material is used for the skin. It can be plastic, ceramics, fiberboard, drywall and other suitable components.
Among the shortcomings of this method are the difficulties in the process of repair or prevention on communications, as well as a significant reduction in the area of the room. Often, these structures are used in toilets, but they are found in the bathrooms.
Angle Reassembly
In terms of its design, this partition is essentially the same as its continuous counterpart.  It is used to hide the riser and other communications that are located in the corner of the room. If the pipes are laid at a distance from the corner, then it is necessary to block the large area. This is a big minus.
Rectangular box
This is a universal design, which is used with vertical as well as horizontal pipes. The base is located as close to the pipes as possible, only where they are laid. The protrusions that are formed can be used as small shelves for storing various things useful in everyday life.
In the process of creating, there may be some difficulties with concealing the riser in the bathroom - the towel warmer is thus very difficult to hide. Also, there are certain problems in the process of repair of heating systems, with partial or complete replacement of communications.
Box with several levels
This is nothing but a combination of false walls and boxes. Often, the latter are installed as tightly as possible to the pipes, but at the same time they are removed from the wall. The box repeats all the projections of the pipeline. This makes it possible not only to remove pipes from the eyes, but also to keep the area of the room as much as possible.  This solution is best used for large bathrooms and toilets. In small rooms, all efficiency will be lost.
Features of hinged structures
Let's see how to close the riser in the bath with blinds and shutters. The use of hinged structures makes the process much easier - it is much easier to fasten the blinds than to make a special frame.
The method with the blinds is considered more aesthetic. Among the advantages are no barriers to access to communications. Blinds can be installed in the bathroom if the pipes are located on the rear wall. If the communications are on the side wall or in the corner, then there will not be much use of the blinds.
Experts recommend for rooms with high humidity to choose They have more reliable characteristics than traditional plastic. This hinged design will make it possible to get the bathroom in one shade, without sharp color transitions. If the color of the blinds does not fit, then the metal product can always be painted in the right shade.
In addition to blinds, you can also highlight the shutters. These solutions are perfect for toilets. First make the markup, and then on it make a design. It is almost impossible to find standard shutters for bathrooms and toilets. As for the use, then they are used in the same way as blinds. But they can only close the back wall. They are installed on the side in the form of a combination with a gypsum board box.
Soundproofing
The stoic in the bathroom is a rather noisy thing, and therefore soundproofing of communications is essential for residents of high-rise buildings. The noise that will be heard from the installed structures is unlikely to please the owners. This is actual more for drain pipes.  To solve the problem of excessive noise can be with glass wool. The material wrapped around the pipes will help to significantly reduce noise effects.
Features of assembly of the construction of boxes and false walls
Let's see how to make a box based on a metal frame. For assembly, a pipe is required, which is connected with a welding machine using a preliminary sketch. The resulting frame is fixed on the ceiling, on the floor and walls. The wall of the pipe should be a small thickness - 1.5 millimeters. Such a profile will make it convenient to fix the skin with the help of ordinary self-tapping screws.
Facet such a frame with plasterboard, particleboard, MDF or any other material. Due to the use of a profile pipe and the need for assembly using welding, the design is quite expensive.
Experts know how to fix the riser in the bathroom more economically - you can make a frame of wooden racks. The basis of the design is collected from the racks according to the sketch. The fastening points are the same - the ceiling, the walls, the floor. Reiki pre-treated with special formulations for protection from moisture.
CD and UD can also be used as a basis. This design is suitable if the box is covered with plasterboard. The assembly is made from a grid 600x600 millimeters. Fastening is carried out with the help of self-tapping screws. Sew the riser in the bathroom with plasterboard or plastic. Method of attachment - horizontal, every 500 millimeters. The plastic must be fastened to self-tapping screws equipped with a press washer.
Casing materials
Among the materials intended for sheathing of boxes, one can distinguish polyvinyl chloride. It is very aesthetic, does not differ in mass. The material perfectly withstands the impact of moisture, which is very important in the bathroom. From polyvinyl chloride it is easy to get the parts and elements necessary in shape and size. A seamless plastic panel creates the effect of structural integrity. There is a wide range of colors and shades available. You can easily find panels for any interior.
Often, laminated chipboard is used as the coating material. This is the main material from which furniture is made. This decoration is used to combine the style of the bathroom with the entrance door. Laminated chipboard withstands the impact of moisture, and its only drawback is the price.  How to hide the riser in the bathroom as cheaply as possible? If you need a budget option, then experts recommend that as a skin in this case, use the lining. It can be used both in the bathroom and in the toilet. But the material must first be treated with a special impregnation. The lining should not be used together with plastic panels or ceramics.
In addition to these cladding materials, it is also possible to advise cement-particle boards. These are heavy, but at the same time, durable materials. Such a plate is not afraid of the effects of moisture, it does not deform under the influence of temperatures - it can close the hot water stand in the bathroom. The slab is cut with special grinding machines. The disadvantage is great difficulty in the process of equipping the service hatch.
Decorative finishing
When the carcass plating process is finished, proceed to the decorative finishing work. It is best to equip the frame in the process of repair in the bathroom. As for the finish, the experts recommend tiles. It is relevant for bathrooms. This is a universal finishing material. The inspection window is also subject to finishing.
Along with the tiles, use and textured plaster. It makes it possible to hide small defects and errors that were formed during the installation of the skin. But plastering will require serious care, unlike ceramics.
Conclusion
The material was told how to hide the riser in the bathroom. Apparently, there are a lot of ways. Each has its own characteristics. It remains only to choose the most suitable.
As far as the aesthetically pleasing bathroom, in which all the pipes artfully covered with decoration, it is clear to everyone. Therefore, when you see in your apartment an undisguised riser in the bathroom, there is a natural desire to remedy the situation. About how to close the riser bathroom and what you need to do for this, we'll tell you below.
So, if there is a combined bathroom in your dwelling, the riser in the bathroom is most likely present. All the work that will need to be done to hide the riser in the bathroom can be broken down into 4 stages:
2. Selection of suitable materials;
3. Closing the riser in the bathroom;
4. Finishing.
Stage 1. Preparatory work
Before sewing a riser in the bathroom, experts recommend that all possible malfunctions of the sewerage and water supply be eliminated. We will understand what is meant by this. Sewer pipes should not have a crack, if you notice a crack, then this pipe immediately changes to a new one. If you feel a specific sewage smell, then the joints and hatches should be properly smeared with silicone sealant. Also note that the places where the pipes pass through the floors of the room are carefully treated with cement mortar.

The aforesaid concerned sewer pipes, now we will pass to the water pipes.
First, they should not have any signs of corrosion. If any, then they must be removed, and the pipe should be painted with water-resistant paint. As an additional protection can serve as a casing, made of foam polypropylene, put on the pipe. Such a casing will protect the pipe from sudden temperature changes and partially solve the problem of condensate precipitation. The second thing that needs to be done is to check the functionality of the cranes that feed the water, to see the state of the threads on the connections. It is recommended that mobile compounds be smeared with some anti-corrosive compound.
Step 2. Selection of materials
Solving the question of how to fix a riser in the bathroom, it is necessary to provide for the possibility of problem-free access to communications on any of their sites. Otherwise, thereafter, there will be a need to spoil all the clearance work to get to the pipe and repair the malfunction.
As a material for closing the riser, brick, monolith and other structures of the same degree of strength are completely unsuitable. Much better suited lightweight materials such as gypsum plasterboard sheets or rough-particle boards. Materials that do not respond well to high humidity and sharp temperature changes are best not to be used, therefore plywood, chipboard, furniture boards fall away.

Another important point - the skeleton skeleton, covering the riser, should provide an opportunity to easily reach the joints of sewage and water pipes. Also, care must be taken that the inspection hatches for water meters and valves fulfill their function, and it is always possible to change the same counters if such a need arises.
Repair of a small bathroom (video)
Professionals advise in the lower part of the brother-in-law to build a 20-centimeter edge made of brick or concrete. This side keeps water from spilling all over the bathroom during maintenance operations.
3. Stage. Closing the riser
For plating the frame, you can take a moisture-resistant plasterboard if you are going to build a blind structure equipped with a revision hatch. But keep in mind that if there is a need for full access, then this skeleton will come to smash. Therefore, in this respect, the orienting chipboards can be used more efficiently, they can be made of a removable cover, which will consist of several panels attached to the frame of the riser using magnets, loops or stops (a combination of fasteners is also possible).

Making self-made inspection hatches and installing removable panels, you need to take into account the weight of the structure, taking into account the tile or other finishing material, otherwise there will be a risk of distortion.
From above it is better to install the loop mechanisms, and from the inside (from below) mount an additional stop that will be in contact with the transversely located frame beam.
Stage 4. Finishing
So, to the last stage the question of how to close the riser in the bathroom, you will be practically solved, there will be only a few nuances for exterior decoration. If you intend to use a ceramic tile for walls in a bathroom, then it is better to fasten it to the skin by means of "liquid nails", beforehand providing the surface primer.

In order to facilitate the weight of the structure, cork panels that are not afraid of humidity, bamboo and other light decorative materials can be used. But remember that a beautiful finish should not go to the detriment of functionality and create difficulties for repair.
If located in the bathroom and strongly visible communications spoil the interior of the room, then this is not a problem. Find out how to close the riser in the bathroom, and start work.
How to ease the task from the beginning?
In order not to mask the numerous and long pipes, make a plan of all communications in advance and try to arrange them and the plumbing so that in the end all utilitarian details remain as inconspicuous and hidden from the eyes. But still, this is probably not always the case, and often it is completely impossible to hide the riser. But such a problem is not as complicated as it seems if you know the ways to solve it.
Ways of masking the riser
So how can you close the riser in the bathroom? You can do this in a variety of ways:
- Masking in the walls. In this way, you can hide the riser only at the stage of its installation. And the work is very difficult and time consuming, be prepared for this. First you need to compile and transfer to the wall the layout of all communications. Then with the help of a perforator it is necessary to make grooves, slightly exceeding the diameter of the pipes. Next, the stems are laid pipes. Then it is desirable to cover the whole surface with a drywall sheet, chipboard, plywood or PVC panels to make a kind of false wall. Fill the grooves with concrete is not recommended, with breakage and dismantling, you can severely damage the riser.
- Cupboard. Yes, you can hide the riser in the closet. And you can buy a finished piece of furniture with a missing back wall and slots in the shelves, and make it yourself out of the ordinary. You will need to dismantle the back. Then, using a bit and drill, make holes in the shelves corresponding to the diameter of the pipes. This method will not only hide the riser, but also provide an additional space for storing funds or hygiene items.
- The box is the most common way of masking communications. It is convenient because you can buy a ready-made construction in the sanitary ware shop of the right size. It is easy to install, so that its installation is not difficult. In addition, there are different versions of shapes and configurations: triangular, rounded, rectangular boxes, as well as consisting of one or more levels.
- Drywall partition. To mount it, you must first install a strong frame, which is usually made of galvanized profiles. Although some use wooden beams, this material requires additional treatment with waterproof and antifungal agents. Further on the frame are attached using self-tapping screws and plasterboard sheets themselves, and it is desirable to use moisture-proof ones, since the humidity in the bathroom is greatly increased. The next stage is finishing. You can use different materials, but the most practical and preferred are PVC panels and ceramic tile.
- The structure is made of plastic panels. Plastic panels are practical, inexpensive, moisture resistant, light and relatively simple to install, since they have convenient joints. But the only drawback of their use is the total absence of noise isolation, through them any sounds will penetrate. If this does not bother you, then proceed to work. First, install a frame that can be manufactured in the same way as for a gypsum board. But in this case it is desirable to use the metal profile. Install plastic panels on it. Places of joints can be disguised as corners.
- Rolling shutters will not only hide all communications from the eyes, but also leave unimpeded access to them. At any time, you can push the shutter to, for example, open or close the valve or eliminate any problems. The shutters are installed in the guides. In this case, the riser itself should be located in the recess so that it does not interfere with the movement of the shutter. And along the edges of such a recess the frame of the future construction is being mounted. Currently, you can buy special shutters designed for bathrooms and toilets. They not only play the role of camouflage, but also perform hydro and noise insulation functions, as they are equipped with an additional internal coating.

Some useful tips:
- Do not use capital thick partitions. In this case, when the pipe or connecting parts are out of order, you will have to dismantle the structure, which is not easy.
- To be able to monitor and evaluate the status of the riser, do not close it completely. It is better to leave a small hole, it will make it possible to see all the pipes and even eliminate minor malfunctions. If you want, you can close the window with the door. And it should be of such magnitude that you could not only notice the problems, but also eliminate them, that is, have access to all the pipes.
- In order not only to hide the riser, but also to reduce the noise level created by water, it is possible to lay a layer of soundproof material between the structure and pipes,
- For masking use only moisture resistant materials, because the humidity in the bathroom is high. In addition, condensation may form on the pipes. And if this rule is neglected, then you will not only spoil the septum, but also provoke the development of mold.
- Before starting work, make sure all pipes are working properly. At the slightest leakage or cracks carry out repairs, but only then proceed to disguise. And do not forget to treat all joints with sealant.
- When installing the partition, leave the distance between it and the riser in case of safe installation. It should be about 3-4 centimeters.
- In order to repair the riser, do not dismantle the frame structure, and be able to remove only the skin (probably partially), do not place the profiles in the joints of pipe joints and the location of the valves.
- In advance, make measurements and draw a diagram of the location of all pipes and elements of the future design.
Following the advice given in the article, you can qualitatively and without problems close the riser.
Related articles