Water-heated floor in the bathroom. How to make a warm floor in the bathroom: two solutions to the problem
The warm floor in the house for many people has long been not an exotic, fanciful whim, but a real need to create coziness and comfort. It is known that heat supply in our cities can not provide quality heat to all homes, and the result was the use of a warm floor, especially in the bathroom, where it is nice to stand barefoot after swimming. Often the need arises in families with young children who like to run around the apartment and stand barefoot on the tile in the hygiene room. Competent execution of the warm floor in the bathroom with your own hands allows solving a number of problems, such as a uniformly heated surface, rapid drying of towels, obtaining warm, dry air.
- assembly of pipes under the screed, in which the coolant circulates;
- use of an electric heating cable.
Main advantages and types of floors
The idea of heating the floor is borrowed from the arrangement of Roman baths. When they were erected, special underground channels were constructed, through which the air heated in the attached tanks was heated and heated floors in almost all the bath rooms. The main advantage of them was the creation of heat and a dry room, saving it from moisture. Dry air will be constantly, regardless of the actions, like bathing or just washing in the room.

It differs in that it does not occupy a large area and is invisible, in contrast to a heater, which is sometimes impossible to supply due to a small area. When heating, the whole room is heated, as the heated air rises.
A sample of the modern beautiful and inexpensive warm floor in the bathroom, which is done step by step, can be viewed on the video presented.
Perhaps, after viewing, someone decides to perform repair work yourself. You should know that there are several types of modern systems, such as:
- Water
- Electric
- Infrared
When you turn off the heating in the apartment you can use all the types presented.
Water

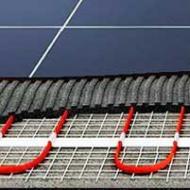
Under the water structure is meant a tube made of PVC, plastic, or copper with a small diameter. They are laid in a certain order on the sexual surface. This type resembles a battery, since when switched on, the heated water (coolant) passes through the pipes. The thermostat allows you to adjust the temperature. This is the most secure type, easy to arrange. Today, equipment is offered on the market at quite affordable prices.
Electric
The most popular and popular are electrical floor structures. Basically, they are used in small rooms, often in the bathroom. They are not expensive. The installation is easy, since the heating cable can be mounted both over the tile and concrete screed, and then closes its finishing floor and temperature insulator. Dangers they do not represent, because the radiation is lower than in the microwave oven.
Infrared

Many consumers are frightened by the costs of operation, as electricity prices are rising. Concerning the "young" thermal floor covering is the infrared film floor, which has a heating sensor.
It is compact, efficient and versatile. The film can be mounted not only on the floor, but on the ceiling, walls.

The costs are significantly reduced due to the fact that with this design, no screeding is required. The parallel connection of the floor elements, both film and electrical, guarantees trouble-free operation.
How to make infrared warm floor - video:
How to Make Your Own Hands
When starting repair in the bathroom, you should start with the installation. It is preferable to use a tile with stacking on sheets of aluminum and a cardboard padding.

In the course of actions, several stages are envisaged:
- scheme of the arrangement of pipes;
- installation of risers for hot water;
- laying waterproofing layer;
- screed under the condition of concrete floor;
- insulation foil;
- assembly and laying of the floor system, connection to the return;
- testing the system;
- grouting cement slurry.
In the absence of the skills of connecting the radiator, independent work is not recommended.
With good ventilation, you can use wood floors, as it warms up better.
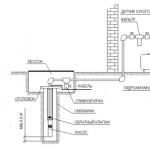
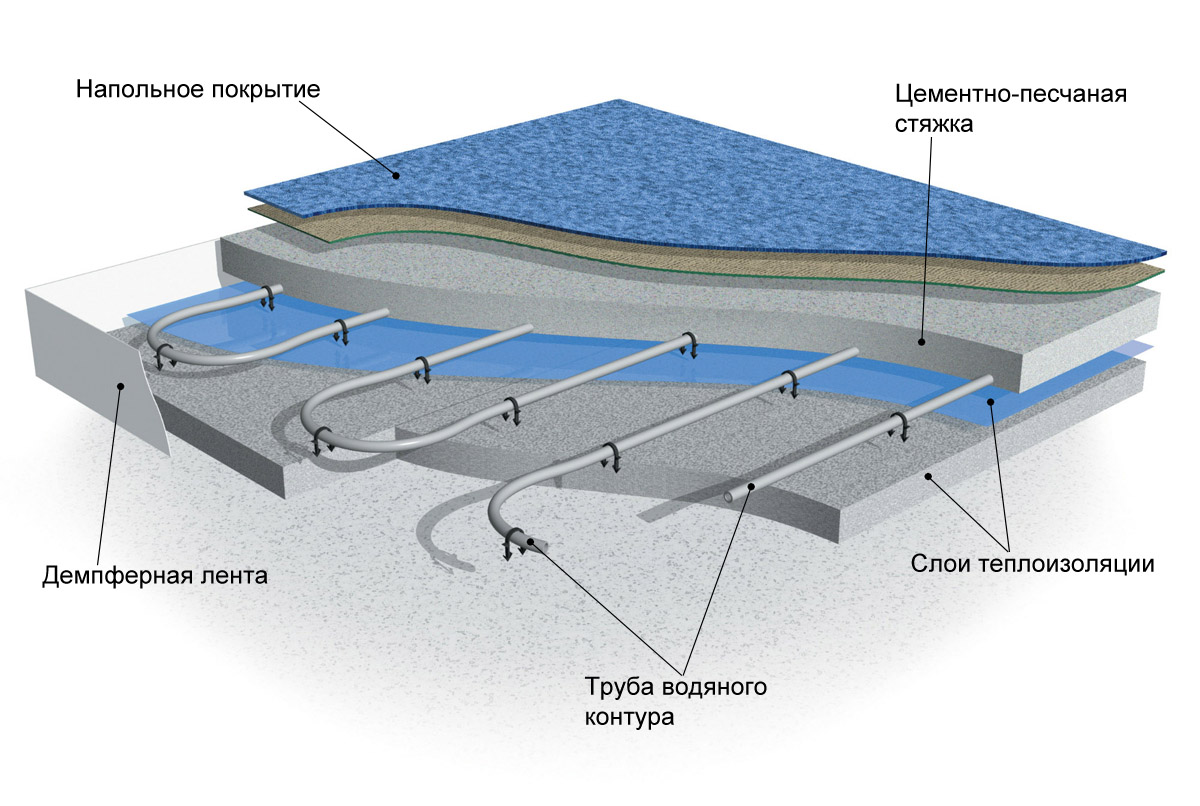
This type includes a layer of thermal insulation, pipes, material for fasteners, collectors with fittings, which contribute to the connection of the system to the overall heating. Preliminary waterproofing, raising the floor by about 7 cm, which is important for low ceiling in the room. It is important to properly lay the pipes, connecting them to the collector, which is fed to the system of general heating.
For the collector, the place in which the temperature control panel is installed is assigned. Floor marking by sectors is performed with the calculation of deformation of the screed when heated. Initially, the drawing is executed on a graph paper, and then transferred to the work site.
For correct registration, you should transfer all points of laying pipes, which are laid with a small indent from the wall. You should think about how to put furniture correctly. Under it, the system can not be laid, significantly saving on the material.
As a thermal insulation foam, foam, or foam polystyrene are used, which retain heat well and are not subject to moisture. To reflect the heat, the floor is covered with a foil substrate, the cuts are connected by an aluminum tape. Further on perimetre the damper tape which compensates under a coupler the expanded heat is pasted.

To fix the pipes, it is necessary to lay the reinforcing mesh, and then the pipes are laid according to the specified scheme.

The distance to the wall should not be less than 8 cm, and between the pipes - 10-40 cm. Pipes are fixed to the grid by plastic straps not much, because when heated, a voltage is created, which can lead to deformation of the system.

After installation, the connection to the collector is made and testing is carried out. It is necessary to hide the pipes in the corrugation, if they are located next to the expansion joint of the coupler. The ends of the pipes are joined with the outlet of hot water and the return hole cold and fixed with nuts. The test is conducted for at least 2 hours. After this, pouring concrete, or laying the tile, is carried out, and cold water may flow in the pipes.
How to make a water-heated floor - video:
How to put an electric warm floor
Heating mats collectively represent an electric warm floor structure.

They are made of fabric with built-in cables of excellent insulation, also equipped with wires for connection to electricity. Temperature control is carried out by the thermostat, which is contained in the system. Mats are cut according to the area of the room, but you can not cut the cable.

Do not break, bend the cable wire. Work with the material very carefully!
The mats are glued to the cementitious screed, and then the tiles are laid on a dry surface. The system is used in small bathrooms. To protect yourself in the future, while the system itself is safe, you should purchase materials from trusted manufacturers and sellers.

The temperature regulator / timer will allow monitoring such a floor to prevent over-consumption of electricity. In addition to mats, many builders lay the cable on a metal mesh according to a specially designed scheme.
Do not lose the layout of the grid, so that in the future you can eliminate various damages.
The cable is connected with a special coupling and immersed in a concrete screed.

Advantages of floor structures
If we compare the heating equipment of premises, modern floor structures are hidden in contrast to conventional wall radiator batteries, which occupy the free space in the room.
In any case, the disadvantage of radiators is that near them it is forbidden to have equipment, furniture. Equipped bath with warm floor covering, the heat of which comes from the bottom up, has a high comfort. Significant savings in private homes. If there is autonomous heating, the heating medium can be heated up to 40 ° C. The main advantage of the warm floor system is that the household will never catch cold in the bathroom.
Often the question arises: how to make a tile on the floor in the bathroom warm, because when you bathe and step on the cold tile, then you do not feel very pleasant sensations. If you are planning to make repairs, the solution to the problem will be a warm floor in the bathroom, which you can do yourself.
At the moment, you will have several options to choose from, each of which certainly has its positive and negative qualities and the difference lies precisely in the type of heating elements that are used in the system for floor heating. The description allows you to get acquainted with their basic characteristics and make a choice in favor of any of the options, if you have not already made your choice.
Warm floor in bathroom with water heating system
This system is a system of flexible plastic pipe, through which hot water circulates, thereby heating the surface. It is this warm floor in the bathroom that has an undeniable advantage in price both with the device and with the service, with respect to other options and in this case there will be no electro-magnetic radiation.
But there are also negative aspects:
- This system is quite difficult to mount;
- The temperature is regulated only by the intake valve, which regulates the supply of hot water to the system, and you can orientate only to your own feelings - change the flow and wait for the result, if it does not suit you, then repeat the procedure;
- Pretty thick layer of screed.
Cable, electric floor heating in the bathroom
This option is very convenient, because the electric warm floor in the bathroom of the cables you can do by yourself, because the installation is not connected with any difficulties. Installation is carried out under the tile, only note that this option is usually designed for small areas of the room.

From the negative sides we can note the following:
- Quite a lot of electricity consumption during work;
- At work there is a small electromagnetic radiation;
- If any part of the cable breaks, the entire system will fail.
Floor heating in the bathroom with infrared, film system
This is a very convenient option, since it is possible to lay such a system under any coating, while the film with infrared emitters has a very small thickness, so you do not have to do the screed during the installation. Films are connected with each other in parallel, which determines the operation of the system as a whole, even if some site fails. Heating the floor in the bathroom you can adjust with a special thermostat and set the temperature at which you will be comfortable.

The negative sides include:
- Quite high cost;
- The power consumption will be significantly increased.
How to make a warm floor in the bathroom with your hands with a water heating system
So, let's understand how to make a warm floor in the bathroom with your own hands, I use a water heating system:
First, you will need to make a layout plan for the pipes in the room, and also plan the location of the cabinet with the collector that connects to the hot water source and passes it through the pipes of the water heating system. In the collector there are several outputs for different circuits - it is due to this and there will be a temperature adjustment in the room, i.e. you can turn on or off any circuits, regulate the temperature in the bathroom.

For the collector, two pipes must be provided - one will be supplied with heated water, and the second one will drain the liquid that has passed through the entire system.
Now is the time to make an excellent and reliable waterproofing, if it has not already been made. If a roll-on waterproofing material was used, it is necessary to properly weld the overlapping areas with a construction hair dryer or soldering iron.
It was the turn of the rough screed, and immediately it is necessary to take into account that its level should be lower than the level of the mark of the clean floor, taking into account the tile of the tile somewhere 7 cm. At this stage, small differences in height are permissible.
Several days it is necessary to "care" for the screed, constantly wetting it, so that the solution has gained strength.
Now you need to cover the entire surface with foil - this will create an additional screen that reflects the infrared waves, sending them back to the room. Fix the foil joints with tape, it is desirable that it was special - aluminum.
It was the turn of the laying of polyethylene pipes, according to the plan previously drawn up. Mount the pipes directly to the screed, while the distance between the pipes must be made no less than 150 mm. Often, for the convenience of fixing pipes on the floor, put a metal mesh, to which you can screw a flexible hose with ordinary wire. Next, attach one end of the pipe to the manifold supply manifold, and the other end to the return manifold.
Pipes are installed and now you are making a final, clean screed, and it is you who need to do it as accurately as possible, since the final finishing will be the laying of ceramic tiles.
Installation of electrical, cable system
First you need to provide the location of the thermostat and the sensor, and also take care of the power supply for the cables - these elements are usually located on the wall, it is most convenient to place them next to the outlet, pre-drilled the hole for their installation. Usually the regulator is installed at an altitude of about one meter from the floor level.

Now is the time to do the layout of the heating elements, and you need to maintain the minimum distance between the cable turns, which are specified in the recommendations from the manufacturer.
Do not forget that for the bathroom it is necessary to provide a reliable waterproofing and if it is not already done, now is the time to tackle this issue.
After the waterproofing, a layer of thermal insulation is arranged, and if there is no reflective layer on the basis of thermal insulation, then, before the insulation, cover the floors with foil, by gluing the joints with aluminum tape. If the surface has irregularities, then at this stage it will not create any special problems and they need not be paid attention.
The cable is fixed to a metal grid - this not only ensures the position of the turns according to the plan, but also does not allow the heating elements to fall into the layer of thermal insulation. The cable turns on a metal grid stack parallel to each other, they can not be crossed. Laying of heating elements is carried out exclusively on the "working" area, because the heating under the bathroom and the sink do not make sense.
Install the regulator in a pre-prepared hole, and also place the sensor in a special corrugated tube and position it so that it is above the level of the screed.
Using a tester, check the entire system - this will show if the cable was damaged during installation.
Now it's up to the screed, and remember that its thickness should be about 30-50 mm. It is advisable to tie up the beacons, as this will achieve maximum horizontality, and note that there should be no voids, since they can cause overheating of certain parts of the system, which will lead to malfunction of the heating elements.
After - again check the integrity of the system by the tester and if the cable has not been interrupted anywhere while working - leave the screed solution to gain strength.
It is not desirable to switch on the system before 27-30 days have elapsed, as this may cause cracks in the screed or damage the integrity of the cables themselves.
Mounting of infrared, film heating system
This system is the easiest to install, although here it is necessary to do something to ensure maximum efficiency.

First, take care of the presence of waterproofing.
A rough screed is made, which eliminates the main irregularities. After she gains strength, you can proceed to the next stage.
Drill a hole at a level of 1 m from the level of a clean floor - here you will install a thermostat, and also make a stroba in advance for laying electrical wires for connecting mats.
Now you need to lay a layer of thermal insulation with a reflective film - this will create the maximum reflective effect, while the heat emitting mats will return to your room. The optimum thickness of the thermal insulator with a reflective layer is 3 mm, and the thermal insulation must have a small shrinkage index, for this purpose a technical plug in rolls of 2-3 mm, foil-isoizol or isolon is suitable.
You cut the heat-insulating substrate along the width of the heating film, the layout is done at a distance of 10-15 cm from the walls, and also with a distance of a couple cm between each strip - this is done in order to ensure maximum grip of the finishing screed with the roughing. It should be noted that under the tile there is a special perforated film with holes - it is these holes that provide a large area of adhesion of a finishing screed or a tile adhesive with a rough screed. Therefore, where there are holes in the heating mats, make holes in the substrate to make the solution available to the rough screed.
Please note that infrared mats are very sensitive to overheating, so do not place them under furniture, in our case these are different plumbing fixtures and, maybe, a washing machine.
Now it's time to connect the whole system and check its performance. Connect the thermostat and the sensor. If everything works, then you can proceed to the final stage.
The final screed with a thickness of about 5 mm is made, and it is desirable to make it a tile adhesive, since this solution has increased adhesion values.
After the screed gets strength - you can proceed to the final finish with tiles.
We need to understand if there is a floor heating in the bathroom

To answer the question whether you need a warm floor in the bathroom, you need to decide whether the comfort of significantly increased repair costs, however, after you bathe, getting on the warm floor will be much more pleasant, and given that the final finish is tile, then in the cold season, such a surface will create a sensitive discomfort.
They say, keep your head in the cold, and your feet in warmth - this folk wisdom perfectly reflects the current state of affairs in the bathrooms of most apartments and private houses. If you are on this page, then you are familiar with the situation when after a hot bath you have to stand on the icy tile floor. Agree, this is not very correct, and the problem needs to be solved as quickly as possible, especially since modern technologies allow heating the floors in any room relatively inexpensively. In this article, together with the website site, we will study two ways how to make a warm floor in the bathroom and make sure that if you want to make it you can at a small cost.
Warm floor in the bathroom with your hands photo
How to make a warm floor in the bathroom: an option for apartments and houses with individual heating
There are two types of systems of warm floors - electric and water. I think it will be wrong to burn extra kilowatts of electricity for heating the floor, if there is a heating boiler, which is able to heat almost anything. The most rational in this situation is a little to alter the heating system and let the hot coolant through the pipes, placing them in the floor. The effect will surpass all your expectations - so you can believe it! How to do it? Let's understand together.
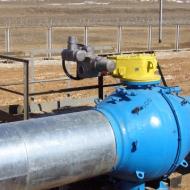
In principle, the connection of a warm floor is best envisaged at the stage of heating design. But if it so happened that a good idea came late, you will have to look for a place where it will be possible to simply break the pipelines and cut them in the distribution manifold responsible for the work of the warm floor.

Water heat floor in bathroom photo
What is a comb (correctly called a collector)? In fact, it is the distributor of coolant flows. To be clear, I will explain - any system of a water-heated floor in a bathroom or some other room is divided into fragments, each of which can in some way be compared with a heating appliance. They may be one or more, but they are all fed through a manifold into which the coolant is supplied via an additional circulating pump.
In general, everything here depends on the size of the room - if your bathroom area does not exceed 5 square meters, then the collector and the circulating pump can generally be abandoned and replaced by cut-off valves with a thermostat. If we are talking about larger bathrooms, then we can not do without these appliances - the floors in this case will not work efficiently, and the boiler will burn more energy.
![]()
The device of warm floors in a bathroom photo
With the collector figured out, now is the time to delve into the device of water-heated floors in the bathroom. To begin with, we will have to completely demount the floor and clean it up to the slabs. After that, make high-quality, lay polystyrene on the floor, or better polystyrene, cover it with a heat-reflecting screen and only then lay pipes with a snake or a spiral.
Before you start pouring a warm floor with a cement-sand mortar, you need to check it - technically speaking, the system needs to be checked and make sure there are no leaks. Further reinforced screed thickness of at least 50mm is poured.

How to make a warm floor in the bathroom
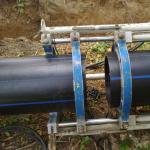
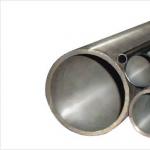
Well, for now, let's talk about the pipes. It will be a big mistake if you try to save money and buy an ordinary, even the most expensive metal-plastic pipe. It will not last for a long time, and after a few years the supply of coolant to the floor will have to be disconnected, and the system either buried or altered.
For a warm floor, there is a special pipe that has a minimum coefficient of thermal expansion and is made of a material with a high thermal conductivity. Such pipes have thickened walls - they can be recognized by red or orange color. By the way, the pipe must be laid in one piece - there should not be any joints in the floor. Connection of the pipe to the collector is carried out above the floor - for this purpose a special locker is installed for the equipment.
Include the warm floor can only after the full drying of the screed - will have to wait a couple of weeks. The floor must dry naturally, otherwise it will simply crack.

Pipes for underfloor heating in bathroom photo
Electric underfloor heating in the bathroom: ideal for an apartment
If you install the electric or infrared floor in the bathroom, then stop worrying about the neighbors from below - the advantages of these methods of floor heating are just the absence of water, leaks that can cause a lot of problems for you and neighbors. As heating elements in these systems, either electric cables or infrared emitters are used. Both systems are assembled very easily - if you, of course, have some concepts in electrical engineering.
The nuances of laying the electric warm floor in the bathroom you can see in this video.
In general, the installation of an electric warm floor in the bathroom is a separate conversation, but since the article is familiar to us, we will outline this technology in short. It looks like this.
- We make a complete dismantling of the floor and clean it, as in the case of the water system, to the base of the floor slabs.
- If the floor is heated by electricity, rather than hot water, this is not the reason to refrain from waterproofing. Bathroom, you can say, stuffed with pipelines, and accidents in them can not be ruled out.

Electric floor heating in the bathroom with their own hands photo
- Warming of the floor is also not canceled - you do not want to heat the ceiling of neighbors from below and waste energy in an expensive way?
- In this respect, we should not refuse from the heat-reflecting screen - it allows us to direct heat inside the room and to heat the floor with greater efficiency.

Heat reflective screen for underfloor heating in bathroom photo
- We make a coupler. Is it necessary to lay a tile or support something? As in the previous case, you need a thickness of at least 50mm.
- We lay the heating elements. It is carried out after the screed is completely dry. It is much more convenient to buy ready-made heating mats - they are sold in rolls with a width of 0.5 m and are cut and wrapped in any direction during the laying process.
- Install the temperature sensor. For him it is necessary to make a small stroba. The sensor is placed between the heating cables and placed in the corrugation, the purpose of which is to facilitate its replacement in case of failure.

Thermoregulator for underfloor heating in bathroom photo
- We make the installation of the thermostat. This is a very important element that provides the warm floor in the bathroom with electricity and monitors its proper operation. There are two types of temperature controllers: a mechanical one that only maintains the set floor temperature, and an electronic programmer that reduces the power consumption for floor heating by optimizing its operating time. It is programmed by days, hours and weeks, and when you are not at home, the heating can be turned off.
- We are testing the system. At this stage, you need to make sure that it works properly. We supply power to the system with a warm floor, and after you feel that the cables are heating up (they do not break the current with the current, you can feel them with your hands), immediately turn it off and proceed to the next stage of the work.
- We fasten the mats with the cable to the floor. In fact, they will simply have to be glued with glue for tiles, so that in the subsequent under them there is no emptiness. Over the cable, you can pour a self-leveling screed of a special brand - the glue must also be specially designed for warm floors.
- The last stage of the work is laying the tiles.

Laying tiles on the warm floor in the bathroom photo
Just as in the case of a water-heated floor, the electric must only be turned on after the adhesive has completely dried and the glue is tiled. This is usually 2-3 weeks (depending on the temperature in the room).
Well, in conclusion, the topic of how to make a warm floor in the bathroom, I would like to say that before you start work on installing the heating system, you should carefully study all the subtleties of the work. But this is already a separate topic, which you can also learn on the pages of our website.
The warm floor in the bathroom is heated floor by electric cable or hot water pipe. A warm floor is not only pleasant comfort, but also a guarantee of health of the owners of housing. Heated floor prevents colds and colds. In addition, this method of heating ensures the correct spread of heat inside the room. How to build a warm floor in the bathroom? And what is the price of installation and operation of such a comfortable heating?
Warm floor: electric or water?
Warm floor in bathroom The room can be arranged with an electric cable, infrared film or water pipes. Each of these methods is good in its own way. The choice of type of energy carrier (electricity or hot water) is determined by the features of housing.
In apartments the warm floor is equipped with electricity. So faster - lay the cable in the screed and close it with tiles. After heating the water inside the floor in the bathroom requires a separate heating boiler. Or tie into the common heating system with the design of additional heating. These manipulations are too complex for an apartment building.
Easier and faster to put on the bathroom floor electric cable or infrared film. Both heat sources for work use electric current, therefore are (in fact) electric floors.

The water floor (heating the floor in the bathroom with pipes with hot water) is cheaper to operate. However, its construction in the bathroom is possible in private homes, where water heating boilers are installed. In this case, the additional heating circuit is connected to the boiler and hot water is pumped through it. The contour itself is laid on the floor of the bathroom and concrete (make a concrete screed on top). Over the screeds with heating pipes lay tiles.
Electric heated floor: technology of arrangement

Let's consider technology of arrangement of a warm floor on an example of use of an electric cable. Immediately make a reservation that this is not a simple cable, but a special wire in the winding with certain dimensions of the section and resistance, of a certain length.
From these indicators will determine the amount of heat that can be released by the metal core of the cable while passing an electric current.
Electric heated floor in the bathroom is equipped with the following technology:
You can learn more about the options for bathroom tiles. And in this article you will be prompted how to properly tile the bathroom.
Electric and water floor: we compare advantages and disadvantages
Heating the floor in the bathroom with electricity has the following features:
- Paul quickly heats up and quickly cools (it's convenient, such a floor can be turned on when coming home in the evening and turn it off for the night).

- The floor consumes a lot of electricity (an extra kilowatt per hour of electricity will be needed for the bathroom area). This must be taken into account in the total energy consumption of the house. If an automatic limit switch is installed at the entrance to the apartment, if the floor, the electric kettle and the washing machine are switched on at the same time, the plugs will be knocked out and the electric current will stop.
- The electric floor forms an electromagnetic field during operation. If you put your ear to the floor, you hear a faint hum. Long stay in the zone of electromagnetic radiation is harmful to health.
However, the conducted studies confirm that the radiation level does not exceed the permissible limits.
Water floor in bathroom differs from electric as follows:
- Slowly heats up and slows down more slowly. It is a floor with good inertia, thanks to which the water pipes are popular in the floors for general heating.

- Can work on any energy carrier. The boiler for water heating can be gas, electric or solid fuel. That is, the water system is more versatile in the choice of heat source. You can connect two boilers to the system and use them at your choice. For example, to pass the heating pipe sequentially through the coal furnace and gas boiler, use coal and gas to warm up the water, or to heat the water with coal / gas alternately.

- The price of pipes for hot water is less than electric cable.
- Installation of warm floors in the bathroom using water pipes is more difficult than electrical flooring.
What determines the price of a floor heating?
The price of a warm floor in a bathth is determined by the area of the household room and the cost of the heater (pipe or cable). In addition, the total costs take into account the cost of dismantling the old coating, concreting the rough and final screed, the price of the tiled flooring.
It is important to know: the reinforcing mesh in the bathroom can not be stacked. Reinforcing of concrete is necessary in the loaded premises (through rooms or public places). In the bathroom, it is sufficient to keep the thickness of a fine concrete screed 3-5 cm.
When working with a warm floor, the layer waterproofing can be replaced with waterproofing additives. They are introduced into the concrete mixture in the kneading stage to ensure the moisture resistance of the concrete.
The warm floor in the bathroom evenly heats the air inside the room. The warmest zone of the bathroom is located at a height of 1 m above the floor. Leave the bath barefoot, change clothes or lubricate the skin with cream, you can, standing barefoot on the floor. It's nice, comfortable and just great.
Systems of warm floor covering, popular among many people, are now installed not only in the basic living quarters. For example, a warm floor in the bathroom can significantly improve the level of comfortable living in the entire dwelling, reducing the humidity and maintaining the air temperature at the proper level.
Considering the fact that in many bathrooms and bathrooms as a finishing material tiles are used, it is in these rooms that the use of an additional source of heating will be very helpful. The bathrooms use two types of underfloor heating: a water and electric floor heating in the bathroom.
The greatest preference is given to the second variant of the apartment owners - the infra-red (electric) warm floor. To a greater extent, its popularity is due to the simplicity of mounting the structure and its further operation.

The warm floor in the bathroom is infrared refers to the electrical heating system, which is based on heating mats. These mats are a textile base, in which heating elements are built. With the help of a thermostat, you can easily set the desired temperature mode for heating the warm floor.
The underfloor heating under the bathroom also belongs to one of the floor heating systems of the house. Their distinguishing feature when installed is the use of hot water as a heat source in polymer pipes, located under the floor of a bathroom or toilet. This method of floor heating in most cases is used in country cottages and houses.
Electric warm floor in the bathroom has many advantages: affordable equipment, inexpensive installation and installation, easy operation.
In addition, the finished structure raises the height of the floor by only 4 mm. The screed with the water floor in the bathroom, as a rule, raises the overall level of the floor by about 8-10 cm. This, of course, is not entirely convenient, so this feature can be safely attributed to the shortcomings of structures of this type. But the water-heated floor in the bathroom is much more economical than the electric version.
Electric heated floor in the bathroom
Electric heating systems of the room are excellent for any premises, including those in which the operation of a water-heated floor is impossible or extremely difficult. Installation and installation of an electric warm floor is quite simple in its performance, so any person can cope with it.

The bathroom is a room with a high level of humidity, due to which the negative impact on your health of fungi is very good conditions for development. After installing a warm floor in the bathroom, the room becomes much drier, which reduces the likelihood of fungus to a minimum.
How to make a warm floor in the bathroom?
If you are confident in your abilities, you can get acquainted with the technology of installing a warm floor and begin the independent installation of the system.

In fact, the electric floor heating system is a separate element from the main floor, which is mounted before or during the coating. This system includes heating cables or mats that are laid on a concrete base (or during the laying of a new tile on an old one), and then firmly adheres to the old coating. Mats consist of a fabric, with wicker heating elements, reliably protected and insulated from moisture. To connect to the mains, free wires of about 4 meters in length are connected to each mat from the beginning and end.
The system is powered by a network with a voltage of 220V. Due to the built-in sensor, the temperature mode of the warm floor in the bathroom is measured, and the necessary heating is set using an electronic thermostat.

The wires of the temperature sensors and the lead wires are fed into the pipes, after which the junction box is closed with a lid. The most optimal methods of cutting with the subsequent laying of thermo-mats are in the bath area and the corners of the room. If necessary, in the mats make small cutouts, trying to exclude the possibility of damage to the heating elements.
Independently to establish warm floors in a bathroom under force to each person, the most important thing - to work accurately and carefully to observe all requirements for installation.
Do not over-tighten, bend or cut wires. Mats should be glued only to a clean and dry surface of the substrate with a special tile adhesive. After completing the gluing, you can begin installing a warm floor in the bathroom with the further connection of all the necessary elements of the system.

The warm floor in the bathroom, reviews of which in most cases are positive, are an ideal solution for repairs, since they are designed for heating of small rooms. Using the thermostat, you can set the desired temperature and keep it in the right state throughout the day.
Warm floor in the bathroom - installation features
Requirements for the foundation of the floor
The working surface of the base must be smooth and clean (the permissible size of the bumps should not exceed 1 cm). To prevent deformation of the thermal insulation layer, the overlapping surface should be leveled using a thin layer of sand-cement mortar.
Required work before laying the thermal insulation layer
Before starting the laying of the thermal insulation layer, you should make sure that the project of the house implies the possibility of installing warm floors in the bathroom. If this possibility is provided, a steam and waterproofing consisting of rolled, lubricating or bulk materials is laid on a clean base.
If the basis of bulk materials are bituminous binders, the bitumen must be thoroughly dried before the installation of thermal insulation from expanded polystyrene materials is started.

What materials are used to make thermal insulation?
A warm floor in the bathroom, the price of which depends on the amount of material used, as a heater, involves the use of expanded polystyrene, hard mineral slabs, a cork insulation, and a special foil.
The need to use aluminum foil for thermal insulation
The electric heated floor in the bathroom means the use of a reflective coating, which is ideal for aluminum foil. But it is worth noting that foil without coating is not recommended, since the screed solution, which has an alkaline environment, spoils the aluminum very quickly, because of which the warm floors in the bathroom will soon require additional repairs.

This foil, to a greater extent, is suitable for equipping the vapor barrier, as it is not suitable for laying under the cement-sand screed. Aluminum foil is recommended for use only under screed on gypsum binder. In such cases, it is recommended to use a foil with good thickness.
A warm floor in the bathroom - a video about the features of stacking the finished insulating boards
Ready-made insulation boards are used specifically for the construction of warm floors. When laying such a material, it must be ensured that there are no cracks or different gaps, otherwise the screed solution can penetrate between the plates, resulting in acoustic and temperature bridges.
Installing a warm floor in the bathroom, you immediately note pleasant changes - in the mornings you will go into a fresh and warm room, rather than a gloomy and damp room with stains and condensation on the walls. More about that, how to make electric underfloor heating , can be found on the link.
Related articles