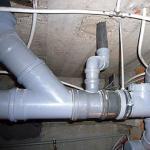
Close the disguise pipes in the tub. How to close the pipes in the bathroom
No matter how original and stylish the design is in the bathroom, the whole effect can easily come to naught. The fault of all the pipes, which are very striking. To save the situation, you need to remove these communications away. Let's look at how to close the pipes in the bathroom so that you can access them for service and disaster recovery.
Selection of materials and requirements
The first and important criterion is a small mass. You should choose the material in such a way that fastening does not require the construction of heavy frame structures. Suitable wooden slats or aluminum profile.
Resistance to increased humidity is also important. Water in the bathroom is common. All that will be used in the finish, should not be exposed to the destructive effects of moisture. Preference should be given to such materials that will not absorb moisture, and also to change their shape in the presence of water on the surface.
The resistance to various chemical influences is important. For cleaning in bathrooms and bathrooms use household chemicals. In the performance of general cleaning, all the elements of surfaces are often subjected to chemical treatment. Therefore, facing materials should easily transfer contacts with household chemicals.
Hidden pipes in the bathroom and bathroom are always the right solution. The box can be made of plasterboard, MDF, plastic panels. You can also apply gypsum 3D panels. They are distinguished by a large selection of textures and can accurately simulate brick, wood, mosaic.
Before hiding communications, you should check their reliability. If you close the pipeline, in which there are even minor defects, you will soon have to dismantle the structure.
How to choose a way of camouflage engineering communications
There are many ways to close the pipes in the bathroom. Variants differ depending on the shape of the structure and the materials used. Let's look at the simplest and most popular solutions.
Box of plasterboard
For bathrooms it is necessary to purchase drywall, which is intended for use in wet rooms. From conventional analogs, it is distinguished by the presence of a special coating. The sheets are impregnated with impregnated and antifungal compounds. From ordinary drywall moisture resistant differs in color. It can be distinguished by the green shade of the surface.
As a basis for the future box will be used a frame made of a rack-mount profile. The profile size is 27 x 60 millimeters. Guides will also be used. Their size is 26 x 27 millimeters. The supporting structure is constructed first, and already on this basis, gypsum cardboard sheets are cut into size.
Stages of manufacturing the box
First of all, mark the walls and floor. Having determined the most protruding point of the pipes on a vertical wall, you need to retreat from it about 3-5 centimeters and draw a line. The same principle is used when marking horizontal surfaces.
Then along the line with the help of dowels mount the slats. To do this, use a guide profile. To these racks fix crossbars from the rack-mount profile. The details are connected by crab fixers at a distance of 15-20 centimeters.
You need to create an amortization for the structure. For this purpose, a special tape is laid in places where it is adjacent to the pipes. Next, the finished construction is covered with strips of gypsum board. Installing sheets, you need to monitor the front side. It must be outside. In the process of screwing the screws it is necessary to heat their hats into the plasterboard.
After this you can proceed to the manufacture and decoration of the door. In the box a technological hatch is cut. To hide it, the door is seated on the hinges. Then, the body and the door are finished with the hinges.
Demountable rubbed with a grater, plastered with a thorough fit of all the seams. To strengthen the strength of the finished box before the putty, it is recommended to equip the corners with a perforated corner. In order to putty put better on the joints between the sheets, the edges of the drywall are chamfered. If this design will hide the communications of the heating system or hot water supply, then in the upper part it is necessary to make holes - through them will come out warm air. In case of water leakage, an additional small hole is made at the bottom of the structure. This is necessary in order to quickly detect a leak and timely repair pipes in the bathroom.

In the process of fixing the profiles to the floor surface, it is necessary to exclude the slightest displacements. Any, even a small error affects the quality of the structure. It will look ridiculous. If the floor and walls of the bathroom are tiled, in the drilling process, you must also pay attention - in inaccurate actions, tiles can crumble and crack. Especially it concerns ceramics. Use only special drills, not universal drills.
Using ceramic tiles
This process is very similar to the work with plasterboard. But to hide the pipes under the tiles in the bathroom, it takes much more effort. The main advantages of ceramic tiles: beautiful appearance and good moisture resistance. The design of tiles easily fits into any design, while communications will be invisible, an additional area is created for storing small items useful in the economy. The coating can be matte or glossy. The hue of the tile should not differ much from the overall design of the bathroom. Only so the box will fit well into the interior.

Let's look at how to close the pipes in the bathroom with tiles. As a basis, a metal or wooden frame can be used. When working with wood, all elements are pretreated with water-repellent compounds. This is important, because such material immediately "leads".
To simplify the task and to prevent possible errors in the process of installation work, it is better to make an approximate sketch of the structure with all the important dimensions in advance. Also, it is not superfluous to make a designation of the places of fixing the elements of the box. This will greatly simplify the installation process.
Stages of manufacture
First of all, the zones where communications pass are marked. Then, from a wooden strip or metal profile, a frame is made, which is then securely fixed to the surface of the floor, walls and ceiling. After that, the base is covered with any available material. It can be a moisture resistant plywood or chipboard.
The front part of the structure should have a hatch repair or installation of pipes in the bathroom will be much easier. The facing material (in this case chipboard or plywood) is pasted with reinforcing mesh. Next on the grid put a ceramic tile. To glue the net you also need the service hatch door. The seams between the tiles are mashed, and then covered with mastic against the fungus.
Ideas of specialists
The design and shape of the carcass largely determines how the pipes are laid in the bathroom wall. With the help of the protrusion, you can hide the communications passing in the combined bathroom. In this case, a built-in drain tank hides in the box.
You can hang the structure on the level of the shell. This solution will not only hide from the eyes of the pipe, but also provide an additional place where you can store household chemicals and other necessary things.

As the doors you can apply already finished products from plastic. Their assortment is quite wide. The presence of a inspection hatch is very important if the pipeline has meters, valves or other controls. Otherwise, you have to disassemble the construction in order to verify the meter reading or to cut off the water.
We use plastic panels
Decorative panels for the bathroom - it's a simple and affordable way with which to hide the pipeline. Due to the wide color gamut of these panels, it is possible to create designs for any interiors. Convenience is also in the fact that each panel element is easily interchangeable. This greatly simplifies the tasks when a partial disassembly of the structure is needed.
The only drawback of plastic panels for the bathroom - a weak fire resistance. Although most manufacturers give a guarantee that in the event of a fire, the product will only smolder, but the smoke is no less dangerous to the human body.

Installation of the panels is performed on the ready-made frame. The same metal profile is used as the basis. Before starting the carcass plating, the starting molding is attached to it using self-tapping screws. To hide the head of the screw, the fixation is performed through the shelf, which is covered by the next panel.
In the molding, the cut preforms are introduced. They are strung one after the other. Each panel should be tightly pushed to the end. And for reliability, its free side is fixed with self-tapping screws. When docking adjacent panels, the edges must firmly fit into the locks of the already installed panels. At the end of the installation work, an external molding is installed. It also eliminates the connection between the frame and the floor or ceiling surface.
Here's how to close the pipes in the bathroom with plastic panels. In fact, if you have certain skills, it's not so difficult. The main thing is to be attentive and accurate.
We hide pipes radically
You can hide communications in a more crude way. They zamorovyvayutsya directly into the wall. So you can hide not only communications, but also add a little space to the bathroom or the bathroom. It should be borne in mind that, according to the building standards, it is not allowed to pile a brick wall-partition and a thin-walled partition in panel houses.
In addition, this work is quite difficult, the main drawback is the impossibility in a short time to gain access to the pipes in the event of an accident. Choosing this option, you should consider the risk of leaks.

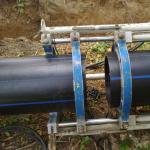
There should be no connections in the wall. For installation use fittings and pipes made of polypropylene - they can easily be welded together. For the laying of communications of hot or cold water supply, the shroud must be equipped with a sleeve made of foam rubber or a thermofleth. These are the basic rules for building data communications in the wall.
Conclusion
So, we figured out how to close the pipes in the bathroom. As you can see, you can perform this operation in different ways. At the end of the works the interior in the bathroom will be really full and harmonious.
The interior of the bathroom or toilet significantly loses due to the bulging water, meters and risers.
Whatever the design decision was, the owner inevitably faces the question of how to hide the sewer pipes in the bathroom.
There are many options. Identify with one way or another possible, based on the features of the construction of the premises and financial capabilities.
Having hidden disagreeable communications, the design of a bathroom or a toilet will be transformed, we will get a cozy and tidy room.
The layout of communications can be performed with the help of made of different materials.
This combined option wins only due to economy, but not quality.
Drown in the wall pipes of different materials can not be.
The fact is that when they expand, they will "play" differently and leakage may form at the junction.
First of all it is necessary to replace "assorted" with one kind of pipe.
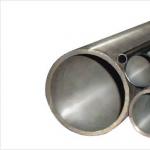
The most reliable are the plastic pipes, which are divided into three categories:
- Polyvinyl chloride
- Polyethylene
- Polypropylene
PVC material is characterized by high strength. It well withstands mechanical loads.
However, it does not respond well to the effects of chemicals and high temperatures. PVC is used for the organization of both external and internal sewerage.
Polyethylene is characterized by strength and resistance to mechanical influences. However, they react poorly to temperature changes, especially at high temperatures. Therefore, to drain hot water their use is not recommended.
Polypropylene is best suited for the construction of internal sewerage. Pipes are strong and resistant. Excellent impact of chemicals, high and low temperatures.
This material can be closed in the wall or floor, without fear of leakage in the near future.
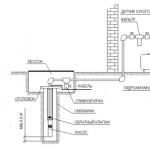
First of all, it is necessary to establish a collector group competently, to use reliable pipes of a durable material - polypropylene, cross-linked polyethylene.
Do the laying with the shortest possible pipe route and minimum connections. The walls in the room should be thick, not half a brick. Thin partitions, panel walls can not be shrouded.
Now, many construction companies at the stage of erecting a house solve the problem of closing sewer pipes. However, in a finished house, you should observe all the requirements for wall sealing of communications:
- A scheme is laid for laying pipes with the least number of bends and joints.
- The holes made in the wall must be larger than the pipe itself - a diameter 5 cm larger than the pipe diameter.
- For each tube, a separate vein is cut - the distance between them is 20-30 cm.
- Pipes are closed with insulation. So increases their wear resistance.
If the design of the room allows you to hide pipes in the wall, follow these simple rules. They will help to avoid fast pipe failure. However, always remember that leakage after the expiry of the time is possible.
Plasterboard structures
An optimal and simple method of closing pipes is a drywall construction. It is quite easy to erect, the material is inexpensive and allows you to peel the surface of the box with tiles or wallpaper.
In the box are hidden not only the pipes, but also the risers in the toilet, counters and any other nodes. For the construction of the box, galvanized profiles and gypsum board sheets are required.
How to hide the sewer pipes in the bathroom under the drywall? The scheme of actions is simple and reduces to the following stages:
- Measures are made for the future taking into account special hatches. They are necessary for quick access to connection points, counters.
- To the walls are attached guide profiles, to them transverse in case of closing the riser or other vertical pipes.
- Between the pipes and the walls of the boxes there must always be a gap of at least 5 cm.
- The profile structure is sewed with sheets of plasterboard.
- The box is faced with a finishing material.
In addition to the gypsum board box, it is possible to build a false wall. However, this option is suitable for large areas. In a small bathroom, she will take a lot of space.
About the nuances of laying pipes in a wooden house is presented on video:
Decorative elements
When there is no possibility to drown uncomfortable pipes in a wall or to close them with plasterboard, decorative special screens will come to the aid. They are designed to cover pipes and other communications. These can be gratings, arches or exquisite constructions with columns.
The products are sold ready-made, more often they are collapsible and can be made to order. Lattices are made of plastic or wood. The color palette of products is wide.
You can purchase screens for painting according to the interior of the bathroom or toilet. Installation of such decor elements is simple and does not require additional attachments.
Installation of decorative special screens for pipes does not take much useful space, which is important for small rooms. This is the most simple and inexpensive option.
When deciding to close the sewer pipes, be sure to consider their condition. Choosing one or another method, be guided by the type of construction design - this house or apartment, the type of walls and the area of the room.
Also do not forget about the design of the bathroom or toilet. Considering all the moments, boldly get to work!
Found an error? Select it and press Ctrl + Enterto let us know.
Pipes that eventually age, wear out and lose a more or less attractive appearance, do not add beauty to the bathroom room and are not a design adornment.
To make the bathroom more presentable, the pipes should be covered with decorative structures. Then we will talk about how to close the pipes in the bathroom, so that this room is not inferior to other rooms of the house or apartment in its aesthetics.
Hidden gasket
Mount pipes in the walls - that's how to hide the pipes in the bathroom, so they were not visible at all. This option is good because after the work done the useful area of the room, which does not differ by the presence of excess square meters, does not decrease in overall dimensions. To lay pipes in the wall, it is necessary in its surface in the direction of wiring to knock out the fences of a certain size. This is not an easy task, as it requires considerable physical effort. This requires the presence of a perforator, a sledge hammer and a chisel. If the wall is concrete or built of modern brick, it is difficult to make a wall in the wall, but it is possible. If the walls of the house were built more than a century ago, in view of the high quality of the brick products, it is even more difficult to break the notch. It is easiest to hide the pipes in the walls, laid out of foam concrete or aerated concrete. Thick blocks easily succumb to the impact force of a perforator or sledgehammer.
- First, a contour of the future groove, which should be slightly wider and deeper than the diameter of the pipe, is applied to the wall of the above material with a pencil, nail or other sharp object under a level rail or level.
- Then the Bulgarian needs to walk along the drawn lines to simplify the subsequent work.
- With the help of a sledgehammer and a sharp chisel or a perforator, stubs of the intended size are knocked out.
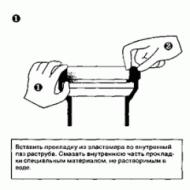
- Pipes that need to be isolated by special insulation from heat losses in systems with a hot water carrier or condensation in cold water pipelines are installed using plastic or metal arc-shaped fasteners with self-tapping screws.
- In order to accommodate the tap and adjusting armature, as well as the water measuring unit, a suitable size rod is made at the installation site.

The wall after the installation of pipelines is lined, and in the place of the water meter and valves, blocking the access of water to the apartment, a locker, a removable tile or roller shutters is chosen.
Tile

One of the effective ways of hiding pipes in the bathroom is the option with the use of tile. It is installed in the same way as when facing the walls, only the installation takes place on a preassembled frame made of a metal profile. For the production of the required metal profiles, tiles, drill with special drills, plastic corners, metal hacksaw or tile cutters and self-tapping screws.
- First, a metal frame is assembled from metal profiles, which is a skeleton for tiling.
- The size of the frame structure is selected and, if necessary, the tile is cut out.
- In the tile under the screws with special drills, drills are made with the help of a drill so that they coincide with the same in the frame.
- Screws fix the tiles on the structure of metal profiles, after which the corner areas are sealed with plastic corners.
Note! Tiles in the place of installation of the water meter should be taken out to remove the water flow rate.
Drywall

The most popular method of closing pipes in a bathroom is today the gypsum cardboard system sewing. When using this material, you need to remember that in the bathroom there is always high humidity. And this means that only moisture resistant drywall is suitable for this purpose.

In addition, in the building materials store you need to buy pipe insulation. Before purchasing an insulating material, which can be of different sizes, you need to work on measuring the working dimensions of the pipes. It is necessary to remove the outer diameters of both water pipes and sewer pipes, as well as determine the length of sections of pipelines. The shape of the thermal insulation material is tubular. The inside diameter of such an article must coincide with the outer diameter of the pipe. The thermal insulation product is cut along, after which it is put on the pipe and fixed with a simple construction tape.
- For the installation of drywall it is necessary to build a skeleton structure in the same way as for tiles, as you could read above.
- In a bathroom with high humidity it is desirable to use metal profiles. The moisture and temperature difference have a negative effect on them to the least extent. In addition, metal profiles are easily mounted. With each other, the frame elements are fixed only with screws, the profile can be attached to the wall using dowels or screws.
- Then plasterboard sheets are installed on the structure of the frame. Professionals practice the lubrication of plasterboard on the inside with two layers of drying oil. This procedure increases the repulsion of moisture by the material.
- To attach gipsokartonnye sheets to the frame, used self-tapping, which must be separated from each other at a distance of at least 0.25 m. After the full plating of the structure of the frame with plasterboard, the surface of the material is primed for final cladding, for example, wallpapering, painting or installing tiles.
Note! This kind of work on masking pipes in the bathroom is considered the simplest and most effective.
Plastic

Panels made of plastic are easy to install. The choice of color solutions for PVC panels is very wide, so the plastic panels are most interesting to customers with an exquisite design taste. In addition, the plastic does not affect the excess moisture in the room. If this material has approached the consumer according to its characteristics, it is possible to start closing the pipes in the bathroom with plastic panels.
- First of all, a metal or wooden structure of the frame is being built.
- For the installation of a wooden structure, the markings on the surface of the wall are made in a vertical direction for fastening the slats. To ensure that the plastic panel does not bend, the distance between the slats should be up to 0,4 m. Special clamps for fixing works are attached to the wall surface, the vertical step between them should be about 0.5 m. Then the bracket is fixed in the same vertical direction fasteners with self-tapping screws 2.5 cm long.
- The structure of the frame from the metal is constructed using the profile of the CD, which is often used to install gypsum boards. Work on the installation goes through the same steps as when installing with a wooden beam, but to the mounting brackets the metal frame is fixed with small clop-screws. When installing the bar or side profile, it is not possible to screw it from the side. In this connection, the following operation is performed: the metal profile is screwed on the side with which it can be done without difficulty, and with the problem - the clamp is bent over the structure and is caught in front.
- Since the tree does not perceive the impact of moisture, the wooden frame is treated with special impregnations to prevent the material from becoming covered with a mold, blackened and eventually rotted. In this regard, the metal frame advantageously differs from the wooden one. Although the profile of metal will cost more than wood, it is less prone to moisture. This means that the metal frame is economically more preferable.
- Elements of the frame are installed in different directions. Depending on the design, they can be in both the perpendicular and parallel positions with respect to the panels. The latter are attached to the transverse elements at a distance of 0.4 m. Different parts of the transverse profile should be at the same height.
- After the installation of the frame, the turn of fixing the panels with the screws comes. The work begins with the installation of a guide element, which gives the places of docking with the walls a more aesthetic appearance. For cutting plastic panels a well sharpened knife is used.
- At the final stage, inspection hatches are installed, which allow access to the pipes. The hatch must be of the required size.
Without a qualification of a builder, any engineer, football player or lawyer will be able to close the pipes in the bathroom with their own hands. You just need to have a desire, and also apply perseverance and wit.
Starting repair in the bathroom, many are thinking about how to disguise the sewer pipes.
And it's true, because noticeable pipes, valves and meters do not add beauty to the interior of the room. How is it better to hide communications without compromising the functionality of the premises?
We bring to your attention some simple solutions to this creative task.

We have already told in previous publications how to close the pipes in the bathroom. In the toilet you can use the same methods, but with some special features.

Let's consider several options in more detail

Plastic and drywall
To begin with, you need to determine the material for the design that will close your pipes. For bathrooms usually used panels made of plastic or plasterboard.
These materials are suitable for any interior, for any decoration of the floor, walls and ceiling.

The difference in the use of these materials is only the need to decorate drywall. While for the plastic panel you only need to choose the shape and color.
![]()
But on the other hand, this drawback of the plasterboard panel is at the same time its advantage, since you can make the panel indistinguishable from the rest of the walls of the room!

Advantages of these materials:
- environmental Safety;
- economical cost;
- simplicity and speed of installation;
- collapsible constructions;
- possibility to leave access to communications (meters, valves, places of possible leaks).
It is important to remember that drywall in the bathroom is better to use moisture-proof!

So, the material is selected. Now we will get acquainted with different ways of installing plastic and plasterboard structures:
We close the wall entirely;
- We establish a false wall;
- We use the box;
- We mount the locker;
- We hide communications behind blinds;
- We decorate.

It is important to remember: for any method of closing pipes it is necessary to provide access to communications. Be sure to make the door! Either hidden (zadekorirovannoy in the style of the entire wall), or buy in the store the usual metal.

Close the whole wall
The first way to hide the pipes in the bathroom is to cover the entire wall with the panel, along which they pass. In this case, the panel is installed on a metal profile base.

In those places where there are no pipes behind the panel, it is possible to build cells for storing necessary items (napkins, air fresheners, etc.).
![]()
It is important to remember: for any method of installation, it is necessary to leave a space of at least three centimeters between the pipes and the wall!

We establish a false wall
The second method is suitable for rooms where communications are located in a corner. In this case, you can close the panel only part of the wall with pipes.

Use the box
If the bathroom is cramped and you want to leave as much free space as possible, you can close the panels with just the pipes.

If the communications are vertical, the construction will resemble a pilaster. If the pipes pass horizontally, you will get a step.

If the pipes do not go to the end of the wall, you can mount a multi-level structure of gypsum board. The resulting shelf can be used as a stand.


Locker
Instead of a box you can put a nice locker from plywood or chipboard. This is the most expensive method of masking pipes, but it justifies itself with its functionality.

You not only hide the pipes, but also get a place for useful trifles.

Jalousie
Usually, blinds are used to camouflage pipes. Their installation requires more time and effort and is more costly. Many believe that the blinds in the bathroom look ugly.
![]()
But plus this solution lies in the availability of pipes along the entire length along the wall. Also available are all vacant places in which you can place shelves.

We decorate
If you like unusual solutions, understand various materials, constantly fantasize, know how to create beauty with your own hands, decorate the communication pipes yourself!


Use mosaic, painting, decoupage, connect different techniques, find only their own, exclusive techniques!

In conclusion, you can say that the choice of materials and structures for masking pipes in your interior remains only for you.

Each of these methods has its pros and cons, any of the proposed options may suit you. Make a decision based on the size and ideas of the interior of your room.

Photo ideas how to close the pipes in the toilet


Related articles