The warm floor is which step of the pipe. How to calculate the pitch or distance between the pipes of a warm water floor
Laying pipes for a warm water floor with their own hands is becoming more popular. Such a heating system can be either additional or basic. To carry out the correct installation of the heating system, you need to know about its features.
To arrange water floors you can use products from the following materials:
- copper;
- crosslinked or linear polyethylene;
- combinations of aluminum and polyethylene or polypropylene;
- composite of polyethylene and polyvinylethylene (glass fiber).
The copper pipeline has the best characteristics. It has the highest level of heat output, it is very durable, does not corrode. However, copper products are expensive, for their installation requires additional equipment. In addition, such a system must be protected from alkali.
 The best option is to choose polyethylene products for making warm floors. It can be cross-linked (PE-X) or linear (PE-RT).
Advantages of the products:
- High level of thermal conductivity.
- Long lasting wear resistance.
- Increased flexibility.
- The inner walls are smooth, due to this they are clogged with sediments very slowly.
- The material does not corrode.
- It can withstand repeated freezing of the coolant.
- Self-assembly of such network elements is simple, as for their proper installation, no special tools and tools are required.
The most reliable PE-X-A. This material has the highest cross-link density (85%). Thanks to this, he has a pronounced "memory" effect. In other words - . This makes it possible to use the axial view of fittings with sliding rings, they can be easily sealed in a screed without problems.
Analogues PE-RT do not have the phenomenon of "memory". Because of this, only collet-type fittings are used with them. They are prohibited from blocking. However, when the contours of the system are laid in integral sections, then all interfaces will only be on the collector. In this case, the use of PE-RT is justified.
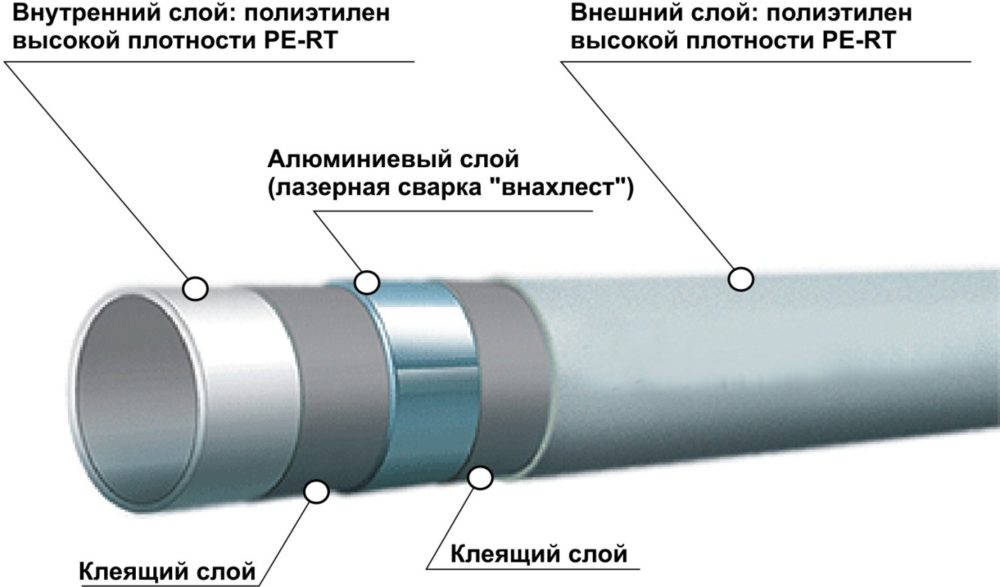
Manufacturers also produce pipes for the water floor of the composite. In this case, the upper and lower layer is made of polyethylene, between them is glued aluminum foil (PE-X-Al-PE-X or PE-RT-Al-PE-RT). Metal reinforces the elements of the warm water floor and serves as a barrier to oxygen.
The disadvantage of alumoplastics is that it is heterogeneous. Different degrees of thermal expansion of the metal and polymer can lead to delamination of the material.
Proceeding from this, polyethylene products reinforced with polyvinylethylene (EVOH) will be the best choice. It significantly reduces the penetration of oxygen into the water coolant through the pipe walls. This reinforcement can be a top coat or be placed between layers of polyethylene. The second option is more preferable.
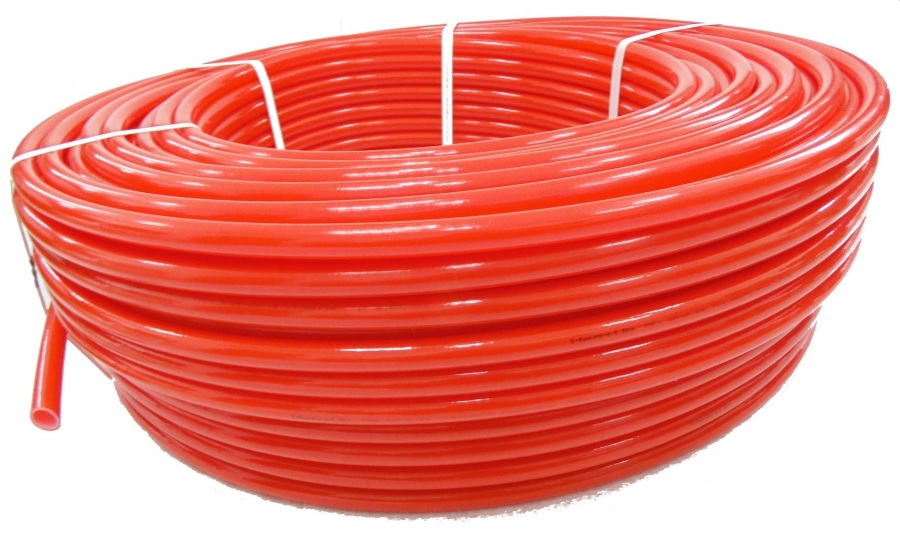
Water warm floors can be laid from pipes of such sizes:
- 16 × 2;
- 17 × 2;
- 20 × 2 mm.
How to calculate the distance of the elements for the assembly of the system?
Before their installation it is necessary to calculate the water floors. For this purpose, a system diagram is drawn up with water circuits. What to consider when calculating:
- Wherever furniture, floor equipment, pipe technology will be installed, it is not necessary.
The length of the contours with a section of 16 mm should not be more than 100 m. The length of the pipes 20 mm for the device of the warm floor should not exceed 120 m. Otherwise the pressure in the heating network will be weak. Therefore, each circuit should be located on an area of not more than 15 m².
- The difference between their length should not be more than 15 m. In other words - they need to be done approximately the same length. The volumetric room should be divided into several heating branches.
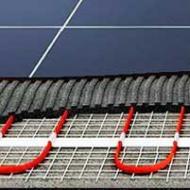
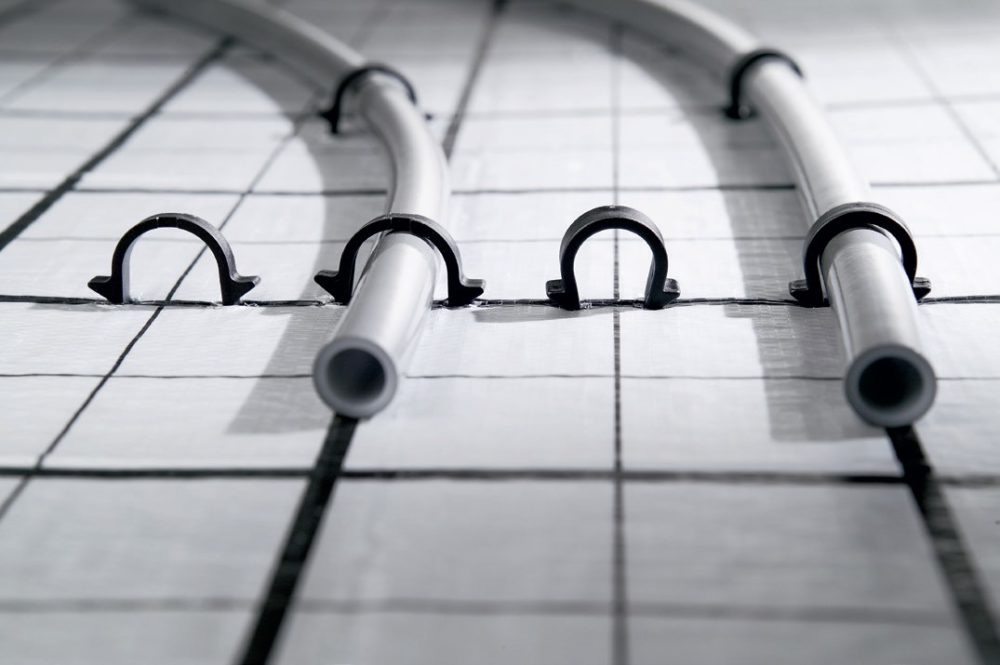
- The optimal step of laying the pipes of the water-heated floor is 15 cm, if you use an effective thermal insulation. With a harsh climate and frequent frosts from -20º and below, the gap between the turns at the outer walls decreases to 10cm.
- At intervals of 15 cm between the pipes, their costs are about 6.7 m per 1 m ² of floor area. When installing in steps of 10 cm - 10 m.
Schemes of installation of a water-heated floor
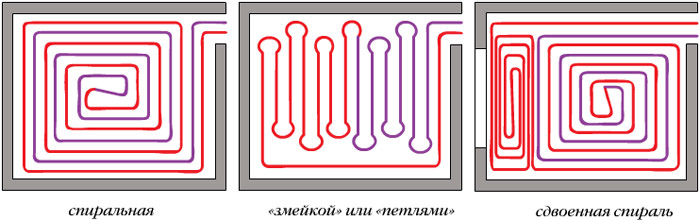
The scheme of laying the pipe of the warm floor can be performed by "snake", "snail" or be combined.

Laying the water circuit with a snake is the easiest. It is carried out by loops. This scheme of installation is optimal in a room divided into functional zones, in which various temperature regimes are planned to be applied.
When the first loop is mounted around the perimeter of the room, and a single snake is launched inside it, half of the area will be sufficiently heated by hot water. In the other part of the room, the cooled coolant will circulate. Therefore, it will be cool in it.
Another version of this scheme is also used - a double snake. With it, the supply and return water branches run along the entire room side by side.
The third variation of such a scheme is the distribution of turns by an angular snake. It is used in corner rooms, when two walls are external.
The windings of the snake can be set evenly. However, the bends of the water loops in this case will be strongly curved.
The advantage of the scheme is the layout of the pipe of the warm floor by the snake is simple. It is easy to plan and mount.
- temperature difference in one room;
- the bends of the pipeline are too steep, which, with a small stacking step, can lead to kinks.
The installation of the water floor by a snail is also called a "shell" or "spiral". With this scheme, the feeding branches and backs are mounted throughout the entire area of the room and run along a spiral parallel to each other. Installation is carried out from the perimeter of the walls to the middle of the room.
The feeding branch in the center of the room ends with a loop. From it in parallel is mounted by its own hands the return and passes from the middle of the room along its perimeter further to the collector. When there is a cold outside wall in the room, a double snail can be laid along it.
Laying pipes of a warm floor with a cochlea has the following advantages:
- The room warms up evenly.
- The hydraulic resistance in the system is small.
- The installation of a shell requires less material consumption than snakes.
- The bends of the turns turn out to be smooth, thanks to this the step between the turns can be done less.
Minus snails - complex planning and labor-intensive installation.
Not all rooms have a rectangular configuration, and there can also be two external cold walls in the room. To make it warm, you can use the combined stacking of contours with your own hands.
In order to warm the room along the outer walls, the loops of the feeding pipes are placed there. Mounting them is best almost at an angle of 90 ° to each other.
Methods for installing a warm water floor
Ways of laying pipes of a warm water floor are divided into concrete and laying.
This method requires a lot of labor and time. The drying time depends on the thickness of the concrete coating. Only after the concrete has reached its full strength (about 28 days) can it be installed on the floor covering.
When the flooring method, ready-made materials are used. Because of the lack of wet work, this laying of the warm floor with your hands occurs quickly. However, the cost of equipping the system increases, as the necessary materials are expensive. When the flooring method is used as a base:
- polystyrene heater;
- wooden modular or rack panels.
Installation of contours on profile heat-insulating mats
 A similar option for floor heating is the easiest. As a base for the water floor, polystyrene insulation boards are used. These mats for installation have dimensions of 30 × 100 × 3 cm. They are equipped with grooves and low posts. Pipe of warm floors clicks into these fastenings. Laying of the finishing coat is carried out on them.
This method does not require the mandatory use of concrete screed. When a floor tile or linoleum is used as a finishing coat, first lay the slabs of GVLV on the base. The thickness of the sheets should be at least 2 cm.
Modular and rack-type types of warm water floors
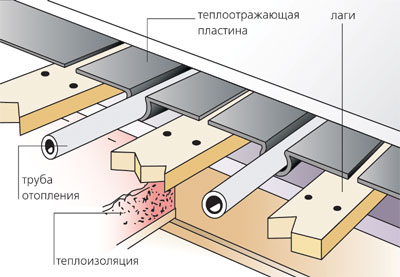
 Such systems are most often used in wooden houses. Laying of pipes is carried out on a rough floor basis or on logs.
In the modular system, ready-made chipboard panels for laying pipes are used. Their thickness is 2.2 cm. The modules have channels for fastening aluminum plates and pipes. Heat insulation with this method of installation is installed in a wooden floor.
Strips are mounted with an interval of 2 cm. Based on the step between the pipes, strips of 15-30 cm in length and width are used:
- 28 cm.
To ensure that heat is not lost, the plates are equipped with pipe latches. If the finishing of the floors is linoleum, one layer of GVLV slabs should be laid on the pipes. When the finish lining is a laminate, parquet, then you can do without it.
Racket version of the flooring systems is almost identical to the modular one. The difference is that instead of panels in it, the bars with a width of 2.8 cm are used.
The gap between the slats in the modules should be at least 2 cm. The rack system is laid only on the logs. The step between them should be 40-60 cm. As a heat-insulating material in this case, polystyrene or mineral wool is used.
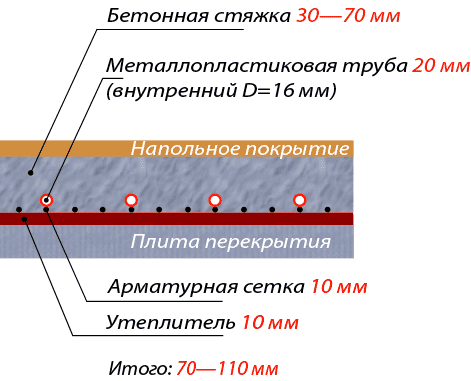
Sequence of laying pipes in a concrete screed
For all its complexity, the installation of a heating network in a concrete screed is now the most common. The technology looks like this:
- First, the base is prepared. The rough floor is cleaned of debris, if it has rips, mounds, they are removed by a puncher.
- Then on the floors of the room waterproofing is laid.
- After that, thermal insulation is installed on top of it.
- Further, the laying rules require between the previously calculated sections and along the perimeter of the walls of the room to mount a compensating (damping) tape.
- Mounted reinforcing mesh.
- According to the chosen scheme, laying of pipes of a warm floor occurs. To the armature they are attached by their own hands with the help of harpoons.
- To check the system, it is filled with water and pressurized.
- Then guide beacons are installed.
- Lastly, a cement-sand screed is poured.
Laying a warm water floor on the reinforcing mesh and without it
There are two options for pouring warm floors with a concrete screed - using reinforcing and fastening mesh and without it.
- If foamed polystyrene mats with grooves for contours are used as a heater, then the grid may not be used. Concrete can be poured immediately after laying the warm floor.
- When using a conventional insulation, then you need to use a thin metal or polymer mesh to reinforce and fix the contours. It should be slightly raised above the thermal insulation material.
Choosing the optimal step
The distance between the pipes during laying depends on the type of room, the heat losses from it and the calculated heating load. Usually the step is from 10 to 30 cm. It can be either variable or permanent:
- When the heating load is less than 50 W per square meter, the contouring is done manually with a constant step of 20-30 cm.
- With a large heating load (from 80 W per square meter or more), the recommended distance between the turns is 15 cm.
- In other cases, a variable step is used. For example, along the outer walls, through which the largest heat loss takes place, the distance between the network loops becomes the smallest (10 cm). On the inner sections of the room, the gaps between the turns of the network increase (20 cm).
The number of turns with the smallest step is calculated in the design of the heating. The distance of 25-30 mm is most often used in very large rooms. For the delivery of coolant in them, contours with a cross section of 20 mm are used.
Important nuances of the arrangement of the heating system in concrete
The water heating network in the concrete must be properly walled in. Therefore, it is necessary to take into account some subtleties.
 Floors before installation of the system on the first, ground floor must be waterproofed. So the premise will be protected from a capillary suction of a moisture from a ground. On the following floors the waterproofing will be the insurance in case of emergencies.
As a waterproofing in most cases, special polyethylene films with a thickness of 150-200 microns are used. The obligatory rule: their cloths on the floor should be overlapped with one another at 10 cm. Joints should be sealed with special tape. On the walls of the cloth are also planted with an overlap of at least 10 cm.
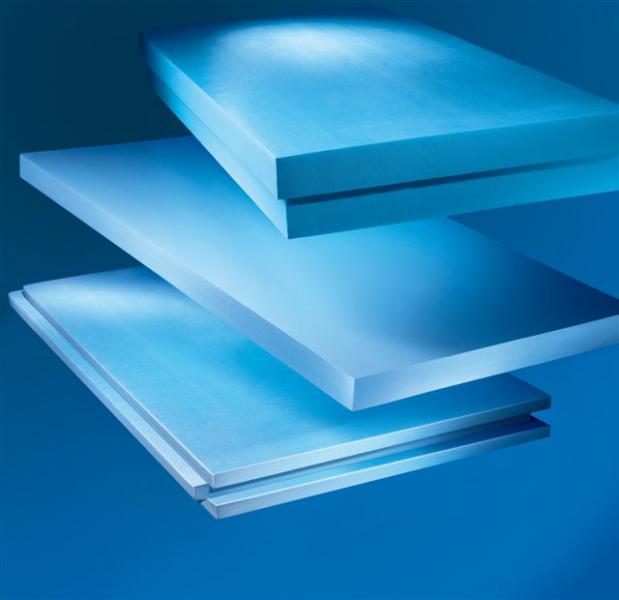
For thermal insulation of concrete floors is best suited extruded polystyrene foam. It has the necessary strength and rigidity. In addition, it is moisture resistant, so it does not need to be protected with a vapor barrier.
For indoor use, polystyrene slabs 5 cm thick will suffice. Only in regions with a very severe climate, the layer of thermal insulation is brought to a thickness of 10 cm. The thermal insulation material must be laid back to each other, and the joints between them must be blown with a mounting foam.
Before pouring the screed, the walls of the room along the perimeter, as well as all obstacles (for example, columns, ledges) and the boundaries of the contours must be pasted with a damper tape. It suppresses the cracking of the solution when it dries, shrinks and expands. This is due to the fact that the material forms the compensation areas. The damper tape is made of polyethylene foam, has a thickness of 0.5-1 cm, a width of 10 cm, in the roll it is from 15 to 50 m.
Methods for fixing contours
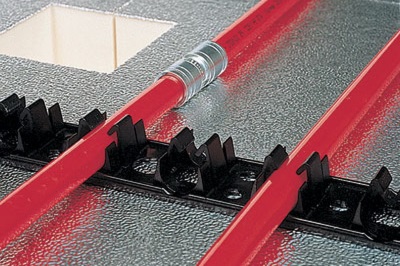
Water heating systems can be mounted in several ways:
- Polyamide clamps. They are used to fix the contours to the reinforcing mesh. The costs of fastening two pieces per 1 running meter.
- Steel wire. Its network elements are fixed to the grid, the expense is the same.
- Building stapler and staples. This method is suitable for fast fastening of contours to a heater.
- The fixing truck. In this U-shaped polyvinyl chloride device, the components of the system snap when installed.
Mounting beacons
 To simplify the work, a device is used for laying the screed, like beacons. They represent the slats, mounted on one precisely horizontal level and with the same step from each other. The beacons are an even metal profile, on the top of which the screed will be poured. Planks determine its future level.
To find the level 0, a laser or water level is used. With their help around the perimeter of the room, on the walls at a height of 30 cm, control points are drawn. There are two of them in each corner and 3-4 on the walls. The tags are connected with each other by means of punching, forming a line of exact horizontal level.
Then, in the corners, the height from floor to level axis is measured. Its minimum value is laid down from the level line and is marked around the perimeter of the room. The tags are then connected by a punch. The highest point is called the zero point. Lighthouses start to be installed from it. This is done with the help of screws or mortar.
Mortar for floor screed
The screed solution is made from Portland cement of M-400 grade and quartz coarse-grained sand (0.8 mm) in a ratio of 1: 3. Water in the dry mixture is added until it reaches a consistency, convenient for easy leveling of the mixture. To increase the plasticity, a liquid soap can be added to the solution.
Mixing of the components of the screed for the water-heated floor is best done not with your own hands, but in a concrete mixer. To increase the strength of the coating, a polymeric fiber can be added to the liquid solution.
Crimping
Pressurization is carried out after the installation of the circuits has been carried out, and they have been connected to the collector. Bite until the end of this procedure can not be filled.
The pressure test makes sure that the entire system is working properly, its interfaces are tight, and the contours are free from defects. If any malfunctions are detected during the inspection, they are promptly eliminated before the screed is poured.
The system is filled with a coolant, the maximum pressure is applied to it. During the test, the network expands to the working size. This allows during operation to avoid strong pressure on the screed.
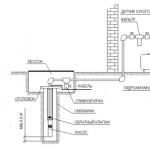
Connecting contours to collectors
Collectors are placed in a special cabinet:
- the width and height of the box can be 0.5 × 0.5 or 0.4 × 0.6 m;
- thickness - 0.12-0.15 m.
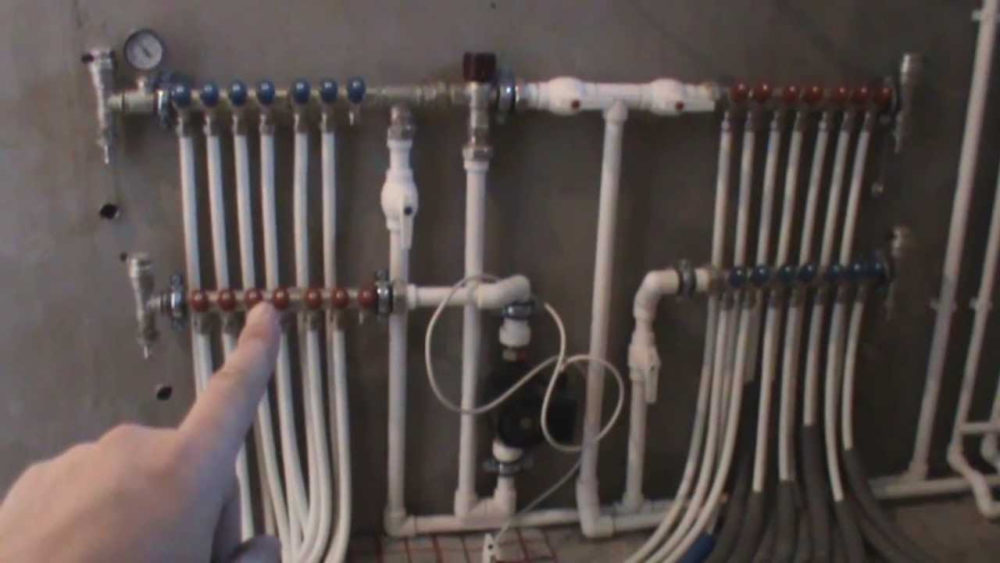
When the cabinet is mounted, the feeder (with heated water) and the return (with cooled coolant) tube should be brought into it:
- To the supply branch by means of a fitting or adapter (with different cross-sections of the elements), a collector supplying the hot coolant is connected.
- The collector is screwed to the return for a branch with cooled water.
Between the pipeline and the collectors, a shut-off valve should be put in the event of accidents and repairs. From the opposite part of the comb, a drain cock must be connected. To accurately control the temperature of the floor on the collectors, you must mount a control valve and a mixing device.
Where can I mount
When installing a floor heating system, do not make common mistakes.
Floor heating in most cases is settled in their own homes. Heating networks of multi-apartment Soviet times are not designed for such a method of heating. The technical possibility of implementing it is there, but the risk that you or your neighbors will be cold is great.
Quite often the whole of the riser remains cold, tk. The hydro-resistivity of the floor network is much higher than that of battery heating. It stops the coolant flow.
Therefore, the management companies do not give permission to install the pipes of the warm floor in old houses. If you do this without reconciliation, you will have to pay a fine and dismantle the system.
However, in new buildings floor water heating can be done and you do not need permission to take it. Their heating networks are initially designed for higher hydraulic resistance.
Adjusting the temperature of the coolant
To keep the feet comfortable, the water temperature should not be above + 45º. In this case, the floor covering will warm up to +28 degrees. Practically all heating technology can not give such temperatures (minimum + 60º). Exceptions are condensing boilers on gas.
When using any other type of equipment, it is necessary to install a kneading unit. In it to the heated heat carrier from the boiler cool water from the return flow is added.
The principle of the device:
- The heated water from the boiler flows to the thermo valve. If the set temperature is exceeded, it is opened to mix the coolant from the return flow.
- Before the circulation pump there is a jumper with a two-way valve.
- When it is opened, water is added from the return.
- The mixed heat transfer medium flows through the pump to the thermostat. It regulates the operation of the thermo valve. Once a certain temperature is reached, the return flow is overlapped.
Distribution by contours
From the knot of mixing, the water flows to the distributor or collector. It's one thing when floor heating is done in a small room (for example, in a bathroom). In it, only one coil of the network can be laid. Then the instruction does not recommend this node.
When there are several turns, we must somehow redistribute the water between them. Then collect it and send it back. These functions are assigned to the collector. It is a pair of pipes on the supply and return branches. They are connected to the outputs / inputs of the circuits.
When floor heating is in several rooms, the best option is to put the comb with the heating medium heating regulation. Often in different rooms you do not need the same temperature.
Conclusion
Installation of a floor heating network will increase the comfort of living in a house in the winter. There are different ways of laying such heating. You need to choose them, based on the thermal loads, the climate in your region, financial possibilities.
Warm water floor - this is an excellent solution for installing it in the kitchen area, because its technological system is selected in such a way that creates the most comfortable temperature for a person.
Step 1: Benefits
Availability
Install this option floor can be based on any radiator heating. The price is also available for any level of income.
Comfort
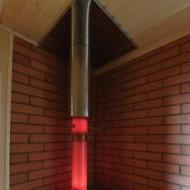
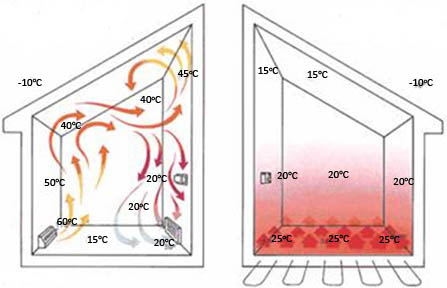
The warm floor, both water and infrared , allows to create the most correct distribution of heat throughout the room. Heated air rises from the top down, so that the feet will not feel uncomfortable all the time. To walk on such a floor is pleasant and absolutely safe.
Hygiene
If we consider the process of heat transfer in space from heat sources, such as radiators or convectors, it can be seen that along with the air, the dust that has settled on the surface rises upward. In the case of a warm floor, this process is excluded. It is very convenient, especially if the family has children or people with asthma.
Economical
The minimum temperature is formed only under the ceiling. But why does man need this space? Thus, the entire territory of the room in which it is customary to be located is heated evenly, this creates the effect of considerable energy savings.
Durability
Of course, the service life will mainly depend on the materials and operating mode. But for water systems it is still much higher than the electric floor.
Self-regulation
One of the important characteristics of a warm floor is that it maintains a preset mode without outside interference. This is due to internal processes, when the floor heats the air until the temperatures match.
Simplicity
A water-heated floor, like film , it is very easy to install, and this can be done without acquiring special skills. Probably the most difficult stage is designing. Schematic layout and thinking over the optimal arrangement requires a careful approach. But the installation of pipes, their connection - it's not difficult.
Step 2. Restrictions
Warm water floor is possible for installation in rooms that were originally thought out for this. That is, if in the cottage the project provides for the possibility of carrying pipes through the floor, then this can be done at any time. In apartments of multi-storey houses, unfortunately, this is impossible. This is explained by the fact that radiators are supplied with water under a certain pressure, which is designed for all apartments, and if you create a divergence, it will change, and neighbors will suffer.
If a decision is made to install a water floor, then immediately you need to consider the option of flooring. For him, the best suited tile or laminate. Linoleum is not very recommended by specialists, because not all of it is made from quality materials. Some components on heating can give off a terrible smell or harmful toxic substances.
Parquet or carpet is also not suitable because of their high heat dissipation. That is, they will not conduct heat outward, but will give back inside, which, of course, is undesirable.
Step 3. Selecting Components
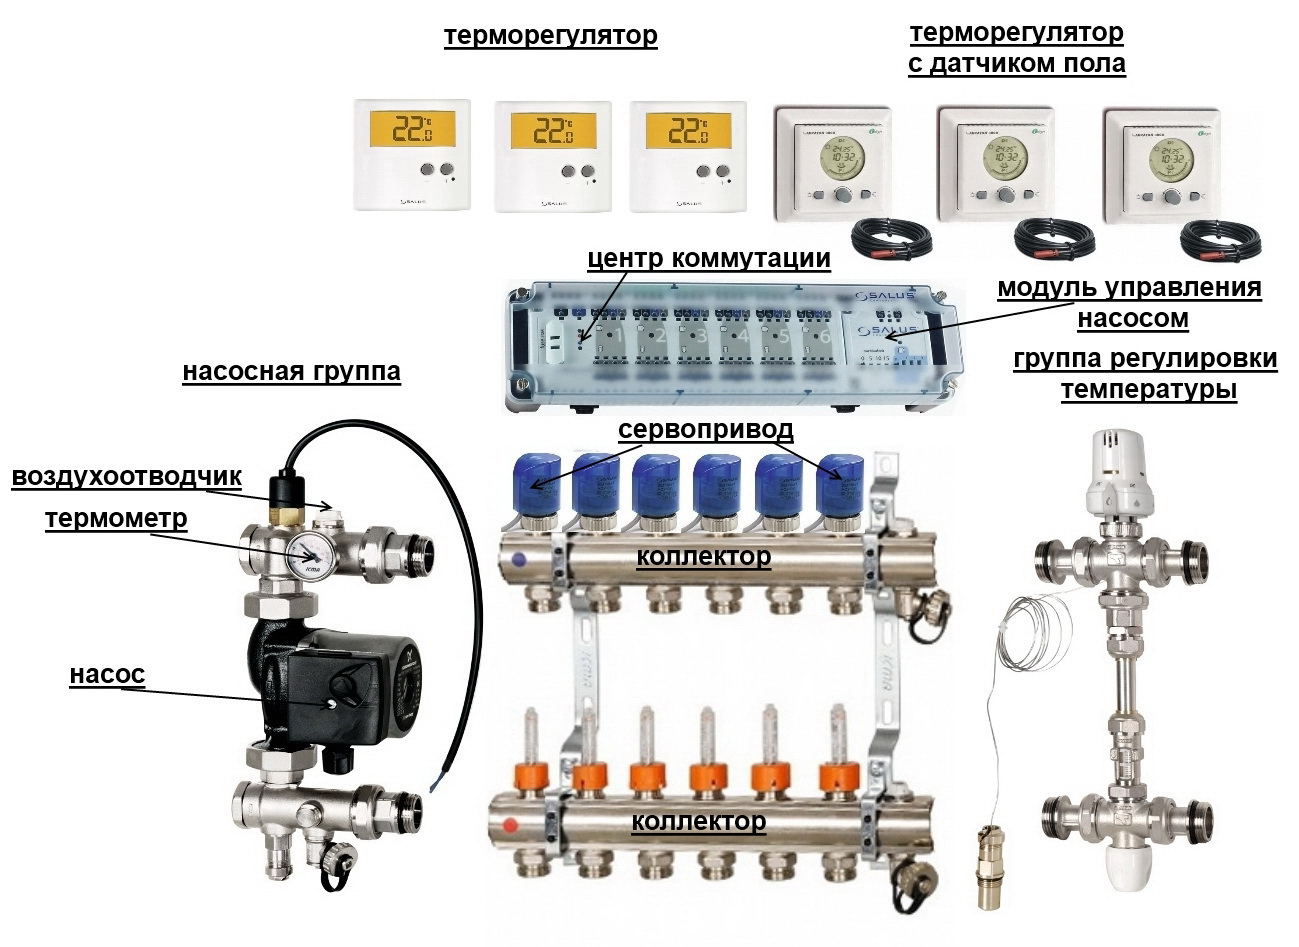
The distribution node. It consists of three parts: a collector group, a pump and a mixer. The pump is responsible for water circulation, and the mixer provides the necessary temperature. If the floor is installed in a small area, then you can adjust it manually, but if the kitchen is very large, then for this purpose there are specially adapted pump-mixing devices.
Underfloor heating circuit. This is actually the system of pipes lying. The optimum option for use is a PEX-based or PERT-resistant material. This raw material is light, durable and flexible. It combines such qualities as low price, good technical characteristics and long service life. The water temperature is evenly distributed throughout the surface. If an error has occurred and you have incorrectly connected the joints, unlike metal-plastic or metal, the pipes will not lose their properties, and you can easily remake the error.
Step 4. Designing
At this stage, you should determine if the floor heating system will be the only heating method or simply a supplement to the main one. In the first case, the temperature distributed over the entire surface will be much lower than in radiators. It is approximately 30-40 ° C, and in the second case it is 60-90 ° C. Accordingly, you need to consider this when setting up the heating boiler.
To calculate the number of pipes a formula is adopted, when for 1 square. Square meter is taken 5 meters pipe. That is, in the kitchen, an area of 6 square meters. m., You need 30 meters of pipes. The most favorable temperature for perception is 24-26 ° C, which means that at the entrance it should be 2-3 degrees higher.
All of the above referred to the heating system only in the floor covering. If the design will be placed in addition to the existing radiator, it is necessary to create a bias unit, which will switch from the high temperatures in the radiators to the lower one, which is fed to the floor. The principle of operation is similar to that of an ordinary mixer on a faucet, it can be controlled either manually or automatically.
For this, you need to choose a step, taking into account such moments:
- Identify areas of active heat loss. They are located near the windows, doors, balcony. Here the step should be 10-15 cm.
- The pipe of the circuit must touch these zones or pass directly under them.
- For the central area of the kitchen, it is advisable to use a step of 20-30 cm.
- The pipe can be laid in two ways: a snake or a spiral. For a small kitchen is best to choose the second option. Bending places will be smaller, which means less chance of deformation of the pipe.
- The distance from the wall to the contour must be at least 15 cm.
Step 5. Installation
The first step is to prepare the surface. For the installation of pipes, it is necessary to exclude a drop of even insignificant heights, and for this purpose a screed must be carried over the entire surface.
- Layer to prevent moisture from entering. Provided with mastic and ordinary film.
- Layer for the elimination of heat loss using a material that includes foamed polyethylene and expanded polystyrene.
After the layers have been installed, it is necessary to make the markings on the floor according to the drawn pipe arrangement. This can be made an ordinary marker. The attachment of pipes to the surface can be carried out in several ways. The first is the use of a rebar, to which clamps or ordinary wires are screwed. And the second one is polystyrene plates. This is a special marking for laying pipes. She has small humpbacks, arranged in a certain order. Between them a pipe is installed.
After all the details are laid out, connected and connected to the distribution nodes, it is necessary to test the system. This is done to ensure that the joints are well sealed, nothing flows anywhere, and the pipes can withstand the pressure.
If everything went well, a concrete screed is made, to which the floor covering will subsequently be installed.
Nuances of screed formation of water-heated floor
There are certain features in the formation of the screed for the water-heated floor. This is due to the principle of heat distribution in its thickness and used floor covering.
1. When laying a warm water floor under the tile, it is necessary to make a screed about 3 to 5 cm thick or to calculate the pipes, so that the gap is 10-15 cm. If not, the heat from the pipes will not warm up the space between them.
2.If placed on such surfaces as laminate, linoleum, etc. the screed is made thinner. In this case, for strength, you can use another reinforcing mesh over the warm floor. This will reduce the heat path from the pipes to the surface of the floor covering. Under the laminate layer of the heat insulator does not fit, because it only worsens the efficiency of the warm floor.

Tips of the master
Previous Next
So that the oil paint does not dry out during storage and that a film does not form on it, put a circle of dense paper on the paint surface and "fill it with a thin layer of drying oil.
"Polyethylene film, covering a balcony or a greenhouse, pre-store from the breakage by wind winding stretched from both sides with about 10-15 cm interstices."
"It's easier to work with a concrete mix, usually clay is added to it, but clay reduces the strength of the mixture." Add a spoonful of detergent to it, calculated on a bucket of water. "
"To ensure that the screw whose head is hidden behind the obstacle does not rotate together with the tightened nut, it is necessary to throw a few turns of thread or fine wire on it and slightly tighten the ends." "By friction, the screw is well held in place." The ends of the thread can be cut off after tightening. "
"Cut out the nesting box can be done without the colover.It is enough to split the front side of the board in the center and cut out a chisel or ax with a half-opening of the required size, then reconnect the halves."
Wooden screws for screws are scattered and fall out of the glass. Do not rush to cut a new cork. Tightly fill the hole in the wall with a nylon from the old stocking. Heated a reddening nail of a suitable diameter, make a hole for the screw. Ra fused kapron will turn into a solid cork.
"The carpentry level can be easily turned into a theodolite, providing it with an aiming device from the slot and the front sight."
"To two linoleum lines are butt-end, it is convenient to use a self-adhesive decorative film, putting it, under the basis of whether noleuma."
"In order for the nail to go in the right direction and not bend when slamming into a deep hole or groove, it should be placed inside the tube, fixed with crumpled paper or plasticine."
Before you hollow the hole in the concrete wall, attach a sheet of paper just below it. Dust and fragments of concrete will not fly around the room.
"To cut the pipe exactly at right angles, we advise you to post it as follows: Take an even strip of paper and thread it on the pipe along the sawing line." The plane passing through the edge of the paper will be strictly perpendicular to the axis of the pipe. "
"Turning logs or wooden beams will help uncomplicated with the method - a section of a motorcycle or bicycle chain, filled with a hook on one side and fixed to a crowbar on the other side."
"In order for one to work with a two-handed saw, we recommend using a simple method: to move the handle of the saw from the upper position to the lower one."
Cut a piece of slate of the necessary size can be sawed, but it is better and easier to break through the line of the supposed cut with a nail hole with a frequency of 2-3 cm, then break the slate on the support.
"The best way to glue the tile to the wall is to take the bitumen, melt and drop just four drops at the corners of the tile."
Shaped holes in the production of curved window casings are most conveniently cut with a hacksaw with a turned cloth.
"Making stained-glass windows is a long and hard thing, you can make a quick imitation of a stained-glass window by taking thin racks or twigs of vines, gluing to a sheet of glass, and then painting the glass and coating it with varnish."
"If there is not a dowel at hand, it can be made from a piece of plastic tube, and the ball-shaped handle can also come up. After cutting a piece of the desired length, make a longitudinal incision, about half, and the dowel is ready."
"It's known how difficult it is to hang a door working alone, but it's enough to shorten the bottom pin by 2-3 mm and it will become much easier to work."
"Very strong, non-shrinkable and sufficiently water-resistant putty is obtained from bustilate, mixed with any powder - chalk, gypsum, cement !, sawdust, etc."
"If you need to screw a screw into the end of the chipboard, drill a hole a little less than the diameter of the screw, fill the hole with the glue" Moment "(only not with epoxy!), Screw the screw in a day after a day, but the load can not be welded. day. "
"To fix portraits, photographs, paintings in wooden frames with glass is more convenient not with carnations, but with clerical knobs bent at right angles." The buttons are gently pressed with a screwdriver. "In comparison with nails, the danger of breaking thin frames is minimized."
"It's not so easy to screw a screw into hard woods." If you screw a screw hole with a screw, and the screw itself is heavily rubbed with soap, then after such an operation the work will go like clockwork. "
In order to save time, the edge of the wallpaper can be cut with a sharp knife, without unfolding the roll. To do this, you must first align the end of the roll and use a simple pencil to circle the edge of the Edge from the outside. While working with a knife, the roll must be gradually turned in the direction of rolling.
For carrying large sheets of plywood, glass or thin iron at home, it is convenient to use a wire holder with three hooks at the bottom and a handle at the top.
IF it is required to cut a round stick into the distance, this work is most conveniently done with a template. It is made of a metal tube with a groove in the middle. The diameter is chosen so that the pattern freely slides along the stick.
To work as a hacksaw, I will feel better if in the middle part of it I have a height of 1/3 of the teeth.
Feb 15, 2013, 10:45 pm
The West has already switched to such a heating system for quite some time. Almost from the beginning of the 80s, from 30 to 50% of the houses built, it was equipped with such a warm floor. But why then did not we have such a system at that time? And now not many people dare to make such heating in their house. But I seriously consider this option, while I am just reading the information, and to be honest about the technology of laying it is written little, for example, till now I can not find what size there should be a step when laying the water-heated floor?
Feb 19, 2013, 12:32 pm
I think you are quite able to cope with this task. Only first draw a layout scheme and calculate everything. It should be remembered when laying pipes of a water-heated floor, that the ideal step of laying should be from 10 to 35 centimeters. The distance from the pipe to the nearest wall must be at least 7 cm. And remember that the length of one circuit must be 50-60m.
What should be done to lay the pipes of the water-heated floor?
Feb 20, 2013, 1:03 pm
The choice of the laying step is determined depending on the type of room and on what is the magnitude of its design heat load. There are two types of laying: with a constant and variable pitch. The water floor with a constant step is laid if the heating load is less than 50 W / m2, with the laying step should be 30 cm. And for high heating loads (more than 80 W / m2), the laying step is recommended at 15 cm. In other, intermediate cases, a variable laying step is usually taken - along the outer walls, where the greatest heat loss takes place, the more frequent stacking step is used, and in the interior zones of premises, the rarer.
What should be done to lay the pipes of the water-heated floor?
Feb 21, 2013, 8:30 am
I personally do not like this option. It though and not expensive, but first in such system under all floor the "rotten" water flows, speak that it negatively influences health. Secondly, the pipes can leak, the fitting is not screwed or the rejected valve is caught, it is fraught with flooding neighbors and full disassembly of the floor with the use of a perforator and a jackhammer. The Maroks will not be! it is much easier to mount an electric floor heating.
What should be done to lay the pipes of the water-heated floor?
Feb 22, 2013, 8:19 PM
Yes, this is certainly quite logical, but according to preliminary calculations it turns out that the water floor in the area of 50 square meters is much more economical than electric. perhaps my calculations and are not true, as I wrote above - so far I have just delved into these questions.
What should be done to lay the pipes of the water-heated floor?
Mar 14, 2013, 6:50 am
Sergey N wrote: I personally do not like this option. It though and not expensive, but first in such system under all floor the "rotten" water flows, speak that it negatively influences health. Secondly, the pipes can leak, the fitting is not screwed or the rejected valve is caught, it is fraught with flooding neighbors and full disassembly of the floor with the use of a perforator and a jackhammer. The Maroks will not be! it is much easier to mount an electric floor heating.
The variant is economical and completely reliable.
Water "rotten" is from the realm of esotericism, not engineering.
Pipes from normal producers do not flow, if not exceed the permissible pressure - a question of normal designers. But there are no joints in the screed, what kind of parsing of the floor with a puncher? Fittings and taps can flow on the water pipe, what now, from the benefits of tsializatsii refuse and the toilet on the street arrange?
If this is the case, then the electric warm floor can also "short", then - fire! There is still to see that it is more terrible - a fire, everything will start to burn at first, then firemen will come and everything will flood! or a trivial leaky tap.
What should be done to lay the pipes of the water-heated floor?
Mar 18, 2013, 10:18 am
I respect electricians more than water. Of course, water has its undeniable advantages, for example, temperature stability, but haemorrhage with it is also not a small one. Complex distribution system, the complexity of temperature control, a huge number of different connections.
The electric field is simple, regulated through a simple simple sensor.
If the topic of the issue - the step of laying depends on the heat. calculation. Increase the step below the nominal value can not be reduced - you can.
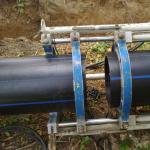
One of the key components of the warm water floor is the pipes, from the right choice and correct layout which largely depends on the efficiency and practicality of the built-in heating.
How to choose pipes for a water-heated floor? How to calculate the pipe footage? This we will talk about in the article.
Having sunbathed with the idea of basic or additional heating of a room or dwelling as a whole, it is necessary to choose the most responsible pipes under. The idea that it is quite possible to do with leftovers and scraps, a material cheaper, should immediately be dismissed.
From the quality, parameters and accurate calculation of components ultimately determines the level of comfort in the home, the economy of the system, its durability and reliability.
Not every option is able to meet a number of requirements, due to the specifics, as well as the operation of the selected heating system:
The longevity of the heated floor system, laid, as a rule, under the screed, should be commensurate with the life of the building itself, at least until its overhaul. Despite the fact that today there are ways to install contours without, the coupler is preferable, as it provides more reliable protection against damage to the pipes, as well as milder, uniform heating, distribution and heat release.
In order to reduce the hydraulic resistance of the system, improve the efficiency of its operation, experts recommend keeping the ratio between the diameter of the pipe for a warm water floor and the length of the contour:
- 16 mm - the maximum length of the pipe for a warm water floor (per 1 circuit) within 60-70 m;
- 20 mm - up to 80-90 m;
- 25 mm - up to 100-120 m.
The greater the distance between the pipes of the water-heated floor, or the pitch in each circuit, the larger the diameter of the pipes is selected.
In calculating how many pipes a warm water floor will require, you need to determine the number of circuits. There is a rule according to which the area heated by the circuit should not exceed 20 square meters. If the area of the room is larger, several contours should be organized.
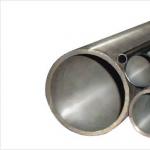
Which pipes to use for a warm water floor?
On the construction market, the following types of pipes for a warm water floor are available to the consumer, characterized by their advantages and disadvantages:
Calculation before laying
It is necessary to decide with. There are 2 main options - snake and snail (spiral). Further on the millimeter paper, taking into account the dimensions of the room on a scale, a contour layout scheme is made. Calculations, most likely, have to be done several times. So, in calculating the pipes of the warm floor, a water calculator online can be of invaluable help.
The layout should include the layout of the furniture. Under heavy heavy furniture, the installation of in-built heating is impractical.
The distance from the wall to the first thread is from 20 cm or more. Determine what distance between the pipes of the water-heated floor (step) can be based on the size of the diameter, as well as the required heat transfer taking into account the total heat loss of the room and the purpose of the system (additional, basic).
In order to avoid uneven heating and cold zones, the step of the pipe for the warm water floor should not exceed 35 cm. The 16 mm diameter is sufficient for normal heating up to 15 cm of surface in both directions.
Conclusion
Determine which pipes are needed for a warm water floor, you can yourself. However, the correct calculation of the footage, as well as the choice of the optimal scheme and the pitch of the pipes of the water-heated floor will help the expert's experience.
There are many kinds of heating of housing. This water, steam, , which can work with different heaters. Today we will talk about pipes for the warm floor - which is better, how to choose the diameter and calculate the length of the kennel, consider the rules of laying. The low-temperature circuit, in comparison with traditional heating systems with batteries, more evenly heats the room. In such a house it is nice to walk barefoot, it is convenient if there are small children in the house. In addition, there are no massive radiators and nothing spoils the aesthetic appearance.
From what material to choose pipes for the warm floor
Metal-plastic pipe.
If you prefer heating the pilaf to a traditional heating system, the first thing you need to do is select the pipes for the warm floor. Which are the best of all? There are not so many variants in principle, only three:
- metal plastic;
- polyethylene;
- copper.
In this case, it is really necessary to consider which pipe to choose for the warm floor among the first two options. Pipes from non-ferrous metal are not only used for low-temperature heating systems, but for traditional ones they are no longer used. This is due to the fact that polymers are in all respects better:
- do not rust - despite the fact that copper is a non-ferrous metal, it is susceptible to chemical corrosion from contact with aluminum and when eddy currents are applied to it;
- easy installation;
- low cost;
- resistance to mechanical stress.
We can choose which pipes are best for the warm water floor among the polymer products, due to the fact that the coolant does not heat up more than 55 degrees in the low-temperature circuit. In principle, the maximum operating temperature, which the plastic withstands, is 95 degrees. It is possible to raise to 110 degrees, but only for a short time. In this case, the polymer greatly expands (thermal expansion). That is why it is so important that the temperature in the warm floor does not exceed 55 degrees. Ideally, the screed should be heated to body temperature. Otherwise, due to the thermal expansion of the tube of the warm floor, the layer of the screed will rupture.
The reliability of PE pipes is better than metal plastic ones. They are monolithic, so do not exfoliate. But the metal-plastic due to aluminum reinforcement is less thermal expansion and they retain their shape after bending. Despite this, experts recommend still to choose a cross-linked polyethylene.
Pipe parameters calculation

Product of cross-linked polyethylene.
After you have decided on the material, you need to do a pipe calculation for the warm floor. It consists in the selection of the diameter and length of the contour. These two values are closely related, since the total hydraulic resistance depends on them. Consider the example:
- a contour of metal-plastic pipes with an external diameter of 16 mm can reach a maximum of one hundred meters, and of tubes of 20 mm - one hundred and twenty meters;
- the outline of PEH pipes with an external diameter of 18 mm can reach a maximum of 120 m.
Then you need to calculate the length of the pipe for the warm floor. For calculation, we need the step value and the area of the stacking zones. Of course, it is important to consider the thermal power of the future heating, but for such calculations there are special programs with many introductory ones. To understand all the subtleties will take a lot of time and effort, so you can rely on the basic principles. The laying distance is the distance between the pipes of the warm floor, which varies from 150 to 300 mm. The closer the pipes to each other, the warmer it will be in the room and, accordingly, the material will go more.
- retreat from the wall 300 mm;
- do not put the pipe where there will be furniture and household appliances.
Having all the necessary values, it is possible to start calculating the length of the low-temperature heating circuit.
Pipe length = (usable area / stacking pitch) + 10%
Direct installation of pipes of a warm water floor

Two basic circuits for wiring a low-temperature water circuit.
It remains to understand how to lay the pipe for the warm floor. To maximize the use of thermal energy from a low-temperature heating system, it is necessary to conduct . To do this, any dense heat insulator (foam, EPP, minvate, expanded clay) is suitable, but in priority, of course, .
Absolutely senseless to use reflective insulation. Firstly, it works properly only if there is an air buffer zone. Secondly, the solution corrodes the aluminum foil and after a couple of years there will be nothing left of the reflecting surface. When laying pipes for a warm water floor, it is desirable to make a waterproofing so that neighbors do not flood in case of a leak.
There are four ways of laying pipes of a warm floor:
- snake;
- double snake;
- angular snake;
- snail.
Consider the editing algorithm. To begin with, the working surface is leveled and the heater is laid. Then put a waterproofing and glue the damper tape around the perimeter of the room. After the waterproofing, the reinforcing mesh is laid for the future screed - it is better to take a sheet, and not in rolls. A pipe is attached to the reinforcing mesh according to the chosen scheme. It is important to secure the contour well, so that it does not move during the filling of the screed. Over the pipes, concrete is poured. The thickness of the layer should be at least 3 cm, ideally 5-7 cm. Otherwise, the floor will crack.
Be extremely careful not to damage the pipes. Determine the location of leakage in the warm floor is difficult. Clear signs of an accident are . Determine the exact location can only be a thermal imager.
Outcomes
For a warm floor, use metal-plastic pipes with an external diameter of 16 and 20 mm, as well as PEH pipes with an external diameter of 18 mm. To calculate the length of the contour, you need to know the useful laying area and the distance between the pipes (15 to 30 cm). Installation is accompanied by the insulation of the floor and the installation of waterproofing. Putting the pipes where there will be furniture and household appliances is not necessary.
Related articles