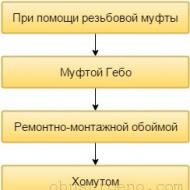
Connect the single-core warm floor to the thermostat. Connection of a warm floor to a thermoregulator
Before you connect a warm floor in your apartment or in a private house, people ask themselves about the varieties of such systems, their advantages, disadvantages and installation features. Heating of this type is much more effective, since warm air, heated from the floor, is evenly distributed throughout the area of the room. There is no need to install radiators, which occupy extra space, and often do not heat the house, but the wall bordering the street.
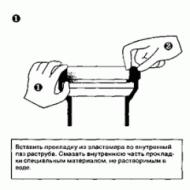
For better waterproofing of the floor, it is necessary to make it a screed.
Installation of heated floors has its own characteristics. The choice of the system should be carried out only after careful calculations, since its replacement involves some difficulties. Every year, manufacturers are improving the layout of their products, which makes it possible to install a warm floor with their own hands, without the involvement of specialists.
Types of heated floors
Depending on the source of thermal energy, the floor can be of three types:
- electric;
- electro-water;
- water.

The electric warm floor works on the principle of a conventional heating spiral - its two ends, closing, begin to heat the conductive metal along the entire length. The structure of the cable sheath, its cross-section and the degree of heat transfer are calculated in such a way that the heating temperature does not rise to the values when the wire starts to burn.
The system of this type is laid directly into the cement screed, on top of which almost any decorative coating is installed. The exception is natural cork and parquet - the temperature of their operation should not exceed 28 ° C in order to avoid irreversible structural changes.
Electro-water systems are a transitional type between electric and water. The source of heating in them is a metal wire, and the effective heat distribution is provided by the heat transfer fluid. An important difference from the previous type is that the cable is not attached inside the mounting tubes, but is in a free state in the environment of the liquid. This allows, in the event of a breakdown, to replace the wire quickly and quickly without damaging the floor covering, the concrete screed and the entire system.
The water heated floor is connected to the gas boiler circuit, in this case the usual warm water acts as a heat carrier. Before connecting warm floors of this type, some people do not think how the water will be heated, thinking that the heat source will be a central heating system.

According to the current legislation, there is a ban on the installation of warm floors, connected to the general heating. This is due to the numerous cases of improper installation, which is carried out without the approval of the project, with the lack of passports and other technical documentation for heating devices. All this in combination with exceeding the temperature of the coolant leads to frequent pipe breaks, flooding and failure of the entire house heating system.
Any attempts to mount such a scheme at home are considered illegal and entail the imposition of a fine. Obtaining permission for a water-heated floor to be connected to the central riser is only possible in cases of horizontal type of distribution of heating pipes, with the vertical type used in most high-rise buildings, your chances of legalization are close to zero.
Selection of components for the water heating system
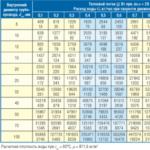
The first thing to take care of is the calculation of the system's power. The efficiency of heating depends on several parameters:
- the area of the room;
- the cross-sectional dimension of the pipe;
- coolant temperature;
- initial air temperature;
- step of laying pipes;
- thickness of concrete screed and type of floor covering.

The calculation can be done either manually or with the help of specialized software packages. In the second case, you will protect yourself from a lot of mistakes and get an installation diagram at the output, working on which you can conduct installation in specific conditions.
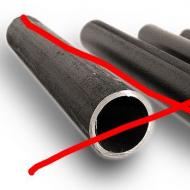
The second important parameter is the choice of the type of pipe over which the coolant will circulate. From its properties depends not only the reliability of the system, but also the efficiency of heat exchange with a concrete screed. The most common materials for the production of pipes are as follows:
- Metal-plastic is ecologically safe, economical and has a high safety margin. The disadvantages include the difficulties of mounting individual elements - they need to be welded together, and the equipment for this is quite expensive, buying it for one-time work is not appropriate.
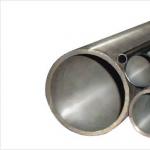
- Corrugated stainless steel pipe - thanks to its structure, such pipes are easily bent, which allows you to assemble a system with a minimum number of connections.
- The copper pipe is characterized by a very high heat transfer. Copper is resistant to corrosion, which increases the lifetime of it compared to other types of pipes, but the cost of such a system is much higher.
The "heart" of the whole system is a gas boiler, one of the circuits of which connects the hot water supply system, and the second one - the pipes of the warm floor. The boiler model must have a limitation on the maximum heating water temperature. The average value of this parameter is 25-35 ° with the possibility of increasing to 45 ° C.
Warm floor connection

Figure 1. Schemes laying the warm floor.
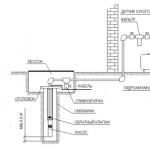
Consideration of schemes for connecting a warm floor is advisable to start with a watery version of it as the most profitable in terms of price and efficiency. Although the installation of such a system has its own complexities and features, but having shown little attention to detail, it is quite possible to do it yourself.
Installation begins with installation on the supply and return outputs of the boiler collectors (combs), the number of connections on which corresponds to the estimated number of pipe circuits. When laying the system, you should be guided by the fact that the total length of a single pipe does not exceed 50-60 meters: this minimizes heat loss, allowing the boiler to work more economically. For complete control over the state of the heating, the regulators are installed on the input connections. In the event of an emergency, this will make it possible to turn off the system. Also, a splitter with a drain cock and air vent is connected to the supply and return pipe. The tap allows draining water from the system, for example, when the heating is turned off during the winter or for scheduled maintenance. The air vent prevents air from entering the pipes, thereby preventing the system from clogging.
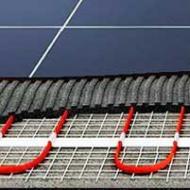
Pipes are installed by one of two methods - "snake" or "spiral". When laying the snake, the temperature difference between the supply and return pipes can clearly be felt, so this method is used in rooms where people are not for long. For bedrooms it is preferable to lay "spiral" (Fig. 1).
The distance between individual pipes should be from 150 to 200 mm. In a cold climate it is allowed to lay with a smaller gap - up to 100 mm.
Electric warm floor - an alternative to water

The principle of the electric floor heating differs only in the source of heating. In this case, it is the usual network with a voltage of 220 volts, to which the system wires are connected via a thermostat. Cables are laid on the rough floor with a spiral or snake, while it is advisable to leave empty space under the areas where large-sized furniture will be located. From above the wires are poured with a concrete screed of a small thickness, and after it has solidified proceed to laying the decorative floor covering.
Electric floor heating can be installed in conditions not suitable for creating a different type of heating, for example, in a conventional apartment of a high-rise building. To improve the efficiency of the system, care should be taken to ensure the insulation of the floor. So, your electricity will not be spent on heating the ceiling to neighbors, but will completely go to create comfortable conditions in the house.
Conclusion on the topic
The warm floor is an efficient and modern heating system.
In a private home, cottage or apartment with an individual gas boiler, it can be an excellent alternative to conventional heating.
The scheme of a warm floor does not assume the presence of separate radiators, which increases the free area of the room and allows the heat to be distributed evenly.
Electric floor heating can be used both as the main source of heat, and as a supplement to the main heating system. On the market are film (infrared) and cable versions of the warm floor.
Familiarize yourself with the procedure for preparation of the foundation, laying and connection of the warm floor, installation of the finishing coat and start work - all the activities can be handled on their own.
First step. We dismantle the old floor covering and screed. When laying a film warm floor, the old screed, if it is in a normal state, can not be dismantled. In the case of the installation of the cable system from the screed will have to get rid of. Thoroughly clean the surface of dust and dirt.
The second step. We lay a layer of waterproofing material. Traditionally, polyethylene film is used, but you can choose other insulation if you want. It is important that the moisture-proof material comes to the walls by approximately 100-120 mm.
The third step. On the perimeter of the base we mount a damper belt on the wall. Thanks to it, the thermal expansion of the system will be compensated during heating. Surplus waterproofing and damping tape gently pruned.
Film and damper tape
The fourth step. We lay the heat-insulating layer. Due to this, losses of thermal energy through the base will be eliminated. Insulate the insulation taking into account the particular location of the room, the type of base and the intended purpose of the heating system.
If you plan to use the system as a supplement to the basic heating, the thermal insulation can be made using foam polyethylene equipped with a reflective foil layer. In addition, the material will take on the function of the substrate under the warm floor.
If there is a heated room on the ground floor, it is best to equip the insulation with sheet polystyrene foam. The thickness of the material is 2-5 cm. Another insulator with a similar thickness is also suitable.
When installing a heating system in an unheated room, for example, on a veranda or balcony, the heat-insulating layer should be more thorough. For example, a 10-centimeter insulation with expanded polystyrene or a mineral wool of similar thickness is suitable.
Fifth step. On the heater we lay the reinforcing mesh. If desired, it is possible to add microfiber and plasticizer to the screed solution. Such an improved composition will make it possible to do without additional reinforcement.
The infrared (film) warm floor is mounted with some differences from its cable "colleague". Follow the instructions.
We make the scheme of stacking
First step. Choose the place of installation of the thermostat. It is recommended to install it with a 15-centimeter spacing from the floor surface.
The second step. We make the scheme of laying the heating system.
Important: the film can not be placed under large household appliances, furniture and other heavy things.
When drawing up the scheme, consider the following important nuances:
- the first row of the film should be laid with an indentation of at least 100 mm and not more than 400 mm from the walls;
- if the heated floor is to be used as the main heating system, it should occupy at least 70-75% of the total surface area;
- if the infrared film is stacked as a supplement to the existing heating, it is sufficient that it occupies about 40-50% of the base area.
We stack and connect the system
First step. We spread the infrared film over the thermal insulation. Adhere to the drawn up scheme. If necessary, the film can be cut to the factory lines.
Laying of elements carry out by copper parts of contacts downwards in a direction to a wall with a thermoregulator.
The second step. We connect the contact clamps to the edge of the copper strip and connect the wires.
The third step. We isolate places of incisions of infra-red film and connections of clips and cables. A special bituminous mastic is suitable for insulation.
Important: the longer the heating plates, the less contact there is. Remember: the strip can not be longer than 8 m.
Install part of the clamps on the current-carrying surface. The remaining ones are located inside the heating film.
The fourth step. Connect the thermal sensor to the underside of the infrared film and carefully isolate it.
Fifth step. Install the thermostat. Before this, the installation of all planned material must be completed and all contacts and cables are connected. The thermostat is recommended to be installed permanently. In the absence of such an opportunity, you can plug it into an outlet as an ordinary electrical appliance.
According to experience, the main part of the cables connecting the thermostat and the heating film, it is best to lay under the baseboard.
Finally, we connect the system to the electrical network and proceed to its testing.
We test the system after installation
Learn the behavior of the system after you turn on the network. If there is overheating, sparks and other defects, everything is fine. You can proceed with the installation of the final floor covering. Before that, it is enough to cover the system with a dense polyethylene film, but some experts still recommend pouring a thin layer of screed - the finishing coat will cover it more qualitatively.
Installation of electrical cable floor heating
First step. Install the thermostat in a pre-prepared wiring box. We bring to the box power and grounding cables. Down from the box we make a groove in the wall for connection to the heating wire.
Installing the temperature sensor for the cable mat
The second step. We prepare the scheme for laying the cable floor heating. You can make this step first, as you please. On paper, mark the space for laying the heating cable. In the future installation of heavy furniture and equipment, the cable can not be laid.
Calculators calculating the length of the heating cable and the pitch of its installation
For the correct design of the circuit, you need to know two values - the total cable length and the pitch of the cable (the distance between adjacent wires in the loop). there are special formulas, but we suggest using the built-in calculator. Enter the values and get the result!
Initial data:
- the total area of the sections of the premises on which the cable will be laid;
- features of the premises - select an option from the proposed list;
- specific power of the cable - it is indicated in the product certificate, W per meter.
For electric warm floors, two methods of connection are practiced. The choice of one of them depends on the type of the warm floor:
- Infrared mats;
- Heating cables.
Infrared warm floor
Connecting a film infrared warm floor is not a difficult task. However, some knowledge and initial skills of electrical work are required. All specialized tools can be replaced by the usual ones, with sufficient accuracy, the quality of installation and connection will not decrease.
- Hole punch;
- universal crimper with profiles for various contact terminals.
First of all, you should take the plan of the apartment and schematically depict the location of stationary furniture without legs and floor household appliances. In these places it is not recommended to place heating elements of the warm floor. With the reference to the size, we mark the placement of IC sheets of a warmer floor in a different color. The completed plan should look something like this: 
We choose the basic wiring diagram for connecting thermoelements: 
Serial connection - the simplest, is used if the room is all one heating zone. 
Serial connection with temperature detector. A thermal sensor is embedded in the power supply circuit, which interrupts the power supply when the temperature reaches a threshold value.
 Scheme of parallel connection of several independent heating circuits with additional regulation of the temperature sensor.
Placement and connection of IR heating elements
- IR thermo panels should not overlap with interior items or trim elements that fit tightly to the floor surface: plinths, decors, etc.
- It is advisable to position the thermo-panels along the length of the room. In this case, there will be less connection points and power lines.
- The power lines of the wiring placed in the floor must be separated by 5 cm from the heating elements. All the free space between them must be filled with thermal insulation.
- The distance between the thermo panels and other heat sources: radiators, hot-water pipes, fireplaces, floor-standing ovens, a distance of 20 cm must be set.
The heating IR film is so convenient that it can be cut at any place, even by the heating section of the element. Before connecting the warm floor, the first and last heating element (black strip) of the thermal panel must be separated from the busbar. This is called die cutting.
 Produced as follows. At a distance of 3-4 mm from the conductive bus punch hole-punched hole with the approach to the white band. Scissors cut out a part of the heating strip 5 mm wide.
Instructions for connecting the thermal panel of the infra-red heat-insulated floor:
(without using a special tool)

Installation of a temperature sensor
The temperature sensor is installed exclusively for the thermal film.

Block of the regulator of the warm floor
The temperature regulator is mounted in the wall. It is necessary to choose the location of its location so that there is direct and free access to the power line. 
- Providing a power cable.
- Remote temperature detector.
- Contact terminal connecting the ground wires.
- Power supply to floor mats.
Connection of the floor heating controller is possible either directly or through a simple plug, like a normal electrical appliance.
In more detail and visually the procedure for connecting a warm infrared floor can be seen on the video:
Electric, cable floor heating
The electrical heating cable can be sold in coils or in rolls already attached to the mesh. 
How to connect a warm floor based on an electrical thermal cable depends on the type of heating element. Distinguish between two-wire and single-core heating cables. In addition, the connection scheme depends on the type of wiring in the apartment. The wiring from the two wires is zero and phase and of the three - zero, phase and ground.
Schematic diagram of connecting the cable of an electric warm floor to a two-wire electrical network. ![]()
 Schematic diagram of connecting the cable of an electric warm floor to a three-wire electrical network.
- Single-core heating cable;
- Two-core heating cable.
In all wiring diagrams, the temperature sensor is connected to the first and second terminals of the terminal block. On the device, these contacts are marked with a corresponding inscription or picture.
 In both cases, after the connection and before installing the finish coat, a test run must be carried out to verify the performance of all parts of the warm floor. This is especially important if further installation is done using concrete pouring.
1.
2.
3.
4.
5.
6.
Floor heating with heating, which has recently become so popular in private housing construction, is water or electric, depending on the type of heating elements. Installation and connection of the warm floor to the control system should preferably be entrusted to professionals, since its arrangement requires the experience of carrying out similar work. To competently execute them, you need to have knowledge of the basics of hydrodynamics or the rules for mounting electrical appliances.
Electrical connection features
One of the main elements that ensure the optimal functioning of the electric underfloor heating is the thermostat, it can be:- a mechanical device - in it the desired temperature is set with a rheostat;
- electronic device - the temperature mode is set on it by using a relay. In these, in the presence of a microprocessor programmer, it is possible to provide automatic control over the process of functioning of the heating structure in accordance with the specified parameters.
- heating cable in reliable insulation, having a large resistance. It produces heat when electric current passes through it;
- thermal mat - in this case, the cable is located on the thermal insulation film, previously performed;
- a special thin film emitting thermal waves (infrared rays). Its thickness is no more than 0.5 millimeters. A flat semiconductor strip is installed in the film layer, providing heating.
Connecting the electrical floor through the thermostat
In order to ensure economical energy consumption when installing an electrical floor for heating home ownership, it must be connected to the power cable directly through the thermostat (as it looks like in the photo). Read also: "".
Typically, the connection scheme for the warm floor is displayed by the manufacturer on the body of the thermoregulatory device or in the passport for it. If you have practical skills and relevant knowledge, you can do it yourself. The power supply cable to the device is led either through the wiring or directly to the outlet, observing. When the thermostat is connected to the mains, a circuit breaker is used, specially designed for this purpose.
Calculation of the required number of temperature regulators
Usually in a private house floors with electric heating are equipped in several rooms and rooms, therefore it is necessary to mount temperature regulators and temperature sensors separately to each of the heating circuits. Thanks to this, during the functioning of the heating system, it is possible to avoid unnecessary loads on the electrical networks. Since heated rooms are not always operated in the same mode, the presence of separate thermostats is a reasonable solution. For example, the bedroom can be heated immediately before rest and during sleep.Features of water heating connection
Ways of connecting the water floor for heating differ from the arrangement of the electrical system.The supply of a liquid heat carrier can be ensured by connecting the structure to the main heating. But such an option is not always acceptable, since it is likely to lead to large heat losses from neighbors if the apartment is located in a multi-apartment building. Without prejudice, such a floor heating device is only permissible for premises in which a stationary system provides for a reverse flow. In addition, the temperature of the coolant will be insufficient to ensure a comfortable stay in the room.

Even such a scheme for connecting a warm floor does not allow for a full adjustment of the temperature regime of the liquid coolant. Even if the gate valves are installed at the inlet and outlet of the heating circuit, the temperature of the water depends on the degree of its heating in the main system, but it is still necessary.
As for individual heating systems, they have practically no drawbacks, provided they are used in private households.
Option one.
How to properly connect the warm water floor is clearly visible on the circuit diagram, on which the elements of the heating system are:- the control valve thermostatic mechanism - on it the signal comes from the temperature established in the sensor circuit. In case of achieving the required temperature regime, the device stops the flow of the coolant;
- balancing valve - this device allows you to prevent idle running of water in the heating circuits. When the coolant supply is cut off, thanks to this element, the heat source starts up in a small circle, bypassing the boiler;
- circulation pump - provides additional pressure of heated water for passage through heating circuits;
- safety thermostat - it is installed at the inlet of the coolant into the pipe of the system to control the temperature of the water;
- collector of a water floor system with heating - it provides distribution of the water coolant along the contours;
- the electric drive of the valve group on the water manifold is responsible for controlling the valves located on the heating circuits;
- by-pass (a collector pendulum valve) - is necessary for reliable circulation of the heat transfer medium through a small system circle;
- several remote water temperature controllers of the floor construction with heating - allows to individually maintain the desired temperature regime in each room in operation, in which heating is performed with the help of this system.
Option two.
There is a wiring diagram using a hydraulic separator, which is a storage tank designed to store coolant. It is equipped in a special collector box in an equipped niche in the wall.
Regardless of which option is chosen for connecting the heated floor with the use of a liquid heat carrier, an important stage in the installation works is the installation of a collector. All contours of the water heating system are connected to this device. The collector allows you to adjust the working pressure and coolant temperature for each circuit individually.
The scheme of circuits with a liquid coolant
When the design of the connection of the water floor is designed, the location of the heating circuits is always calculated (in more detail: ""). They should not be located in a room where installation of stationary equipment is planned.Two main circuits for connecting circuits that ensure the functioning of the water heated floor are "snake" and "snail" (it is also called a "spiral"). Specialists recommend using the second method in regions with a cold climate, since then the floor covering warms more evenly and is not subjected to deformation due to significant temperature fluctuations.
Features of connecting a combined heating system, detailed video:
Combined floor connection with heating
Underfloor heating can function:- as an independent system of room heating;
- in conjunction with the traditionally used radiators.

- boiler;
- pump to ensure reliable supply and circulation of the coolant;
- radiators of heating;
- a tank having a membrane partition;
- control device;
- stopcocks.
The scope of delivery of the thermostat Devireg 535, in addition to the instructions and brochures in different languages, includes the mechanism of the thermostat with a frame and the temperature sensor of the warm floor.

To connect a warm floor to a thermostat, we will use the standard wiring diagram (see the image below), we described it in detail in our article "".
![]()
For convenience, manufacturers always indicate the connection diagram on the back of the thermostat or next to the terminals, so during installation, the circuit always remains visible.

Before connecting the thermostat, the installation of a warm floor Devi, the ends of the heating cable are withdrawn into the jar. A three-core supply cable and a corrugated pipe (corrugated pipe) for the temperature sensor are also connected there.

Before installation, first of all, turn off the supply of electric current. To do this, in the electrical panel, it is necessary to translate the levers of the circuit-breakers in the "off" state, usually the position at which the lever is pointing down. What kind of machine should be switched off, if they are not signed, is determined empirically, turning them off in turn, and checking, for example, with an indicator screwdriver, the presence of voltage wiring for the switch. In extreme cases, turn everything off. But then again, be sure, in the absence of an electric current, in the installation site!

We proceed to installation of the thermostat of the warm floor
1. Set the temperature sensor of the warm floor.

For this:
1.1. Cut the corrugated pipe (corrugated pipe) in the jar.
The second end of the corrugation is near the heating mats in the floor. This is done in order that after all the finishing works, it was possible to place a sensor for the temperature of the warm floor, controlling the degree of heating, from the thermostat to the heated surface.

1.2. Place the temperature sensor of the warm floor in the corrugation, as shown in the image below.
Then push it up to the stop, the sensor must be sure to get into the place specified for it when installing the warm floor.
2. We connect the ground to the warm floor.
How to determine which of the wires is the phase, zero, and what is the grounding yourself, our detailed instructions will help you.
2.1. For this cut off the length (60mm - 80mm) and remove the insulation from the wires, coming from the heating cable.

2.2. For more convenience it is necessary to twist the veins of the screen with each other, as shown in the image below

2.3. Connect, with the terminal board, the ends of the heating cable, with ground (protective zero) of the supply cable - yellow-green wire.
For connection, it is convenient to use the WAGO 222-412 terminal block, as in our example. After fixing the wires, the connection is retracted into the sub-socket and later is behind the thermoregulator.

3. Prepare the thermostat for installation.
Remove the front panel with the frame. To do this, place a straight screwdriver in the groove in the bottom of the front panel and press, as shown in the image below.

After that, click the latch, and the front panel will move forward, and you can easily disassemble the thermostat, into its component parts.
4. We connect the wires to the thermostat.
Cut off the length (60mm - 80mm) and remove the insulation from the ends of the wires (8mm - 10mm) needed when connecting the thermostat. After that, we clamp them in the appropriate terminals, according to the installation diagram.

5. We twist the wires behind the thermostat.
So, when connecting a warm floor to a thermoregulator, a large number of wires are used, for the successful installation of it in the jar, they must be neatly stacked and not obstruct the installation in the future.

6. We expose the level and fix the mechanism of the temperature regulator in the jar.

7. Set the frame.

8. Snap the front panel.
To do this, insert it into the seat and gently, until it clicks, press. After fixing, the front panel also retains a decorative frame.

Now you can turn on the electricity supply and test the operation of the thermostat and the entire underfloor heating system. To do this, press the power button (on the left side of the thermostat), after which the red indicator should light, and the current surface temperature will appear on the LCD screen where the warm floor is installed.
Related articles